I am going to give you all the excuses you need to smash, drop, break and destroy things in the name of high speed photography as I talk you through how to get some great shots of the moment things start to disintegrate.
High Speed Photography: the perfect excuse for destruction!
Have you ever thrown or dropped something just to see the satisfying smash? Imagine being able to catch that action in your photos; the dropped cup with the shards flying, the spilt glass with liquids flying or even an egg smashing. The concept is a simple one but actually getting the shot is far from simple; you need to take a shot that freezes the action precisely as it happens a second too early or too late and your shot just won’t measure up.
Notice: you’ll need some new gear
The technique is fairly ‘kit heavy’ as human reactions are rarely fast enough, but with the right kit and some patience the results are impressive. I use a versatrigger , it’s a relatively inexpensive electronic trigger that has plenty of options for triggering by sound or light and several flashes to supply the light.
This is a UK site, so for those of you in the US you can find a few sound trigger products on Amazon here.
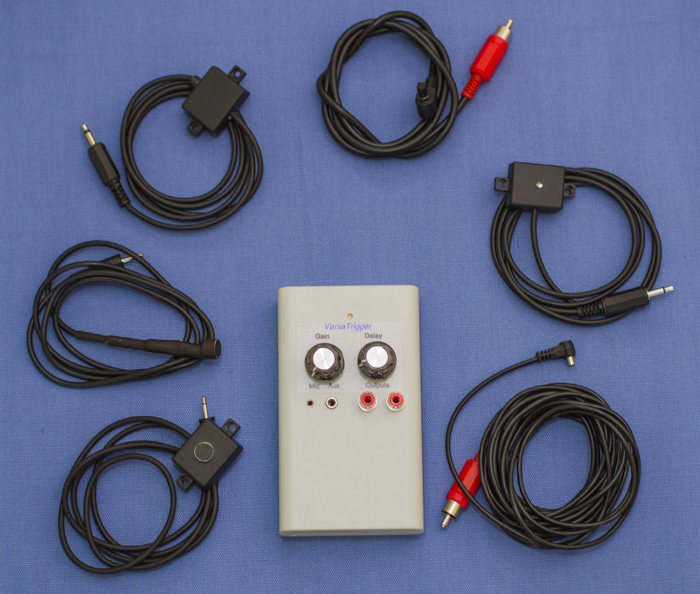
The reason I use several flashes is that when a flash fires on full power the burst of light lasts longer than when it fires at low power so several low powered flashes will give you enough light in a short burst. There’s no need to spend hundreds on flashes though, a set of cheap ones will do as long as they’ll trigger each other to fire, I bought a set of Neewer flashes from ebay and they do the job perfectly.
Again, for those of you in the US, here are the Neewer flashes on Amazon,
Lets get started with a step-by-step high speed photography shoot
By now you are enthusiastic, you have set up your stage, bought your trigger, flashes and a box of things to break. We are going to start by smashing crockery but before I take you step by step through the process let me say again you will need patience, not every break, smash and explosion will happen in just the right way for your shot.
This technique demands that you work in the dark, so consider a simple head torch to save time turning lights on and off as you set up.
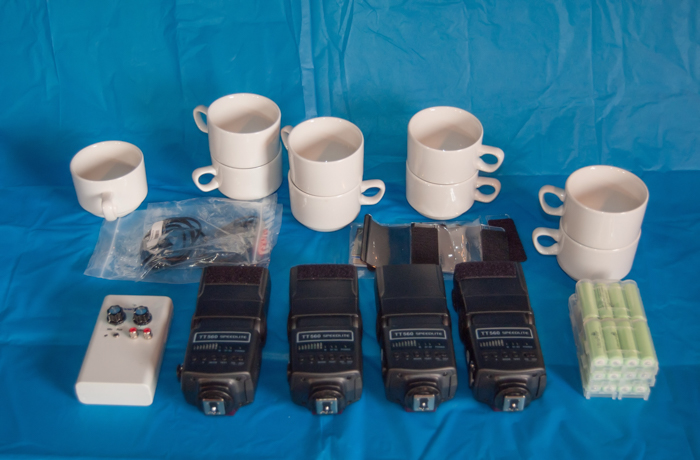
All the kit I used apart from the camera and yes, I really did get through a lot of rechargeable batteries.
1. Choose a long exposure
Choose a long exposure to keep the shutter held open as the event happens the room should be dark and as the flashes are triggered by the smashing sound they will provide light for the exposure.
A three second exposure seems to work well for me; it gives me time to move from my camera to the stage where I’m setting things in motion. Another useful point to that timing is that the trigger is set not to fire more often than every three seconds so the risk of a double exposure is negligible.
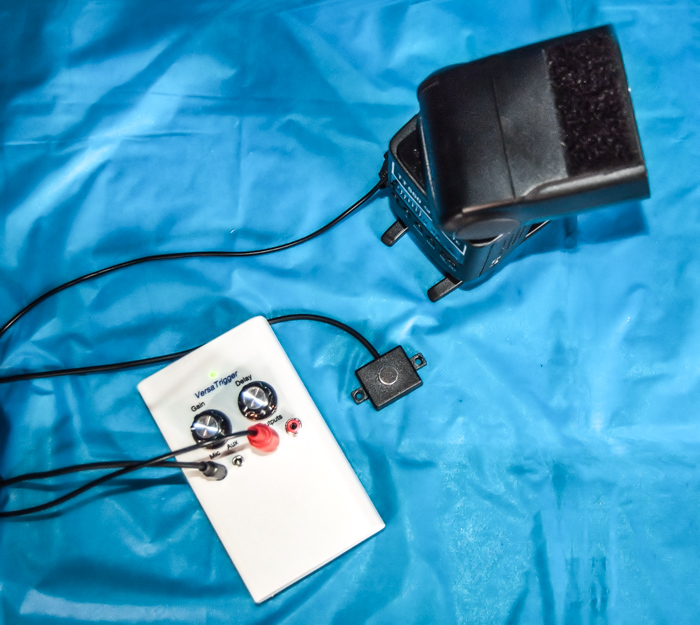
My lighting was all triggered from a single flash wired to the trigger that in turn I had attached to a microphone. This flash acted as the master and triggered the slave flashes.
2. Check your lighting and pre-focus
Taking time now to make sure the point of impact happens in just the right place will save endless frustration. The same goes for lighting, really study your set up and make sure the shadows are just where you want them. I suspended two mugs from string (I’ll clone the strings out later) and used this as the target to pre-focus on.

3. Trial run and test shots

With the camera set to manual focus and live view zoom in and set the focus before taking a few test shots to make sure everything looks good. This is your chance to check exposures, camera positioning and focus. Take shots of your target in position before you break it, do everything you can to be sure the shot you take will be a good one as far as the camera is concerned.
4. Be patient
Time to start shooting your high speed photography!
Check again that your trigger will fire the flashes then,working in the pitch dark, open your shutter then break your crockery. The camera won’t record anything in the dark so all you’ll catch is what the flashes light up.
After the flash you’ll need to keep still and silent until the shutter closes again or you will end up with a double exposure if the flashes trigger for a second time; it’s easy to forget this in the excitement. It takes practice to work in the complete darkness so work slowly and make sure you’re not going to knock anything over by accident.
5. Check your work
Study your shots, zoom in and have a really good look. With this image I was really happy with the freezing of the action, a sign that the flashes were fast enough, but the cups are just too dark in that top area, so I added extra lighting to my set up.

6.Careful Processing
I dropped my final shot into Lightroom to clone out the strings and add a little sharpening. Always take care when processing to make sure you don’t do too much.
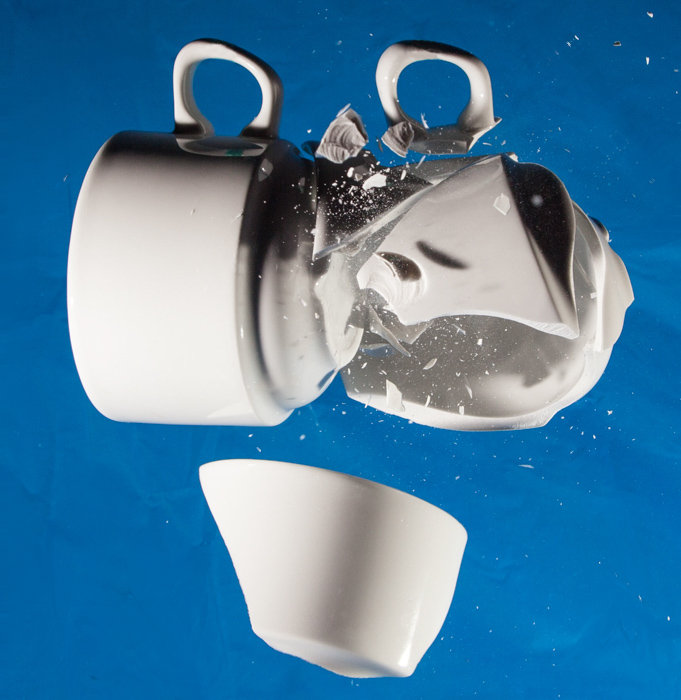
Now you know what your doing have some fun, experiment and try something different! With the equipment set up try as many ideas as you can. Some won’t work but some will and by using your imagination you’ll be able to come up with those one off shots that other people never get.
Make a rig that suits you and your high speed photography project and expect to alter it between shoots. For the cups I suspended them from strings, the egg I shot with a BB gun and the lightbulb I threw into the target area (you can see this photo at the start of the article). Things that didn’t work were dropping the eggs, suspending bulbs from strings and dropping the cups but hey, I learned something.
Don’t expect things to work well the first time, there’s a lot of trial and error involved in this kind of setup so take your time and be prepared to buy a supply of whatever it is you’re breaking. Spend a lot of time shooting and even more time clearing up afterwards.
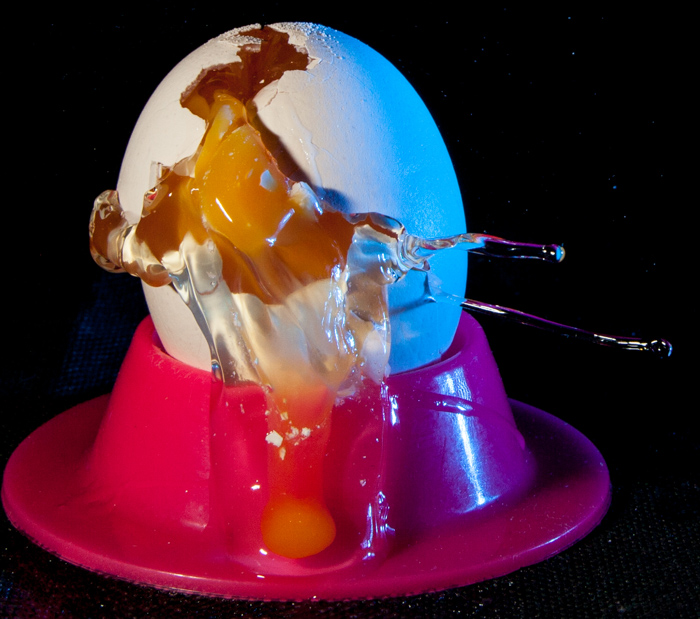
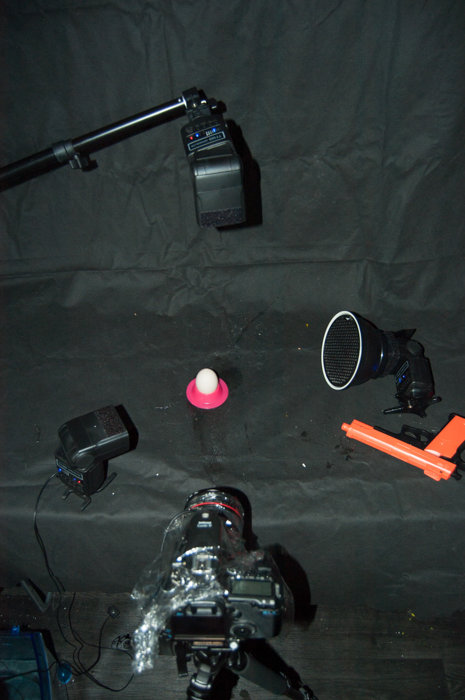
I used two fill lights above and to the left of the egg with my main gridded light to the right and aimed slightly upwards to avoid it shining on the surroundings. By keeping the flash to the right of the camera, low to the ground and coming through a honeycomb it kept the (very eggy) backdrop dark enough so that only a little processing with Lightroom made it invisible.

With a little patience, plenty of enthusiasm and a few bits of kit you’ll be able to have hours of fun. After all, fun’s what it’s all about isn’t it?
Want to learn more fun photography tips?
Click here to check out the Hacking Photography ebook set! Learn how to take incredible photos in only 10 days while mastering your camera.
The ebook set also includes 3 mini-ebooks on how to shoot delicious food photos, how to create excellent motion blur, and how to buy photography gear on the cheap!
I’ve already applied a big discount for being a subscriber – enjoy!



Just to let your readers know, we at Versatrigger do mail out to other countries. Just contact us through the website and we can quote you the cost for postage.
Great article!
Great article that clearly explains one method of using the trigger.
Just to let your readers know, we at Versatrigger do mail out to other countries. Just contact us through the website and we will provide a quote for the postage.
This is perfect.
I have been using VersaTrigger for some months now. Produced a few shots of exploding water bombs using an air rifle and darts. The images can be seen on the VersaTrigger Flickr page
Thank you Aris.
Hi, just to say, nice article.
I have been doing high speed
photography for a number of years, I use a trigger called the CameraAxe. I use this to stop bullets, but a special type of flash is used AN Air Gap flash, which has a flash duration of one millionth of a second.
Great blog, well done Cameron.
Hi Julia.
Thank you.
Thanks Ernie, your feedback’s appreciated.
Hi Alan.
You’ve got some good shots there and inspired me to have another play with water so thanks for that.
Hi I am interested in trying this kind of photography, I am a armature using a
Sony A77ii.
Can you publish a list of items with the picture shown, ie what to buy when visiting the site link.
Hi Colin.
You’d need a Versatrigger, the standard one comes with a microphone, the accessory kit or a PC sync cable and some flashes. You need one that can be triggered by a PC sync and the rest can be triggered by the initial flash.
Other than that all you need is a darkened room and some time.
The team at Versatrigger are a great bunch of people so if you’re even slightly unsure then they’ll be happy to guide you without ripping you of.
I hope that’s helped.
Cameron.
Great article, you make it sound like so much fun.
Thanks Jane, it was definitely fun but a bit on the noisy side.
I found this very helpful, I have been doing some baby photo shoots at the moment and although not the same I have learnt through this article and by experience, preparation is the key! :) Looked a lot of fun!
Photographing babies and children can be really tricky!