Taking the image is half the battle
Bringing out its potential during editing is the other half. The goal should be to get the photo as perfect as you can in the camera, but sometimes it needs some extra help in post production. I’m going to show you a secret weapon at the end of this post that will help you master editing photos in Lightroom fast.
Starting out with Adobe Lightroom software
For most cases I recommend every photographer purchase Lightroom 6 before they purchase Photoshop. Lightroom is also an Adobe product that makes editing much easier by utilizing a series of left-to-right sliders.
Photoshop is more complicated with tons of menus. Lightroom on the other hand can be learned really quickly and makes editing a breeze. Don’t get me wrong, there are plenty of times where I MUST use Photoshop on an image but I use Lightroom more often.
Buy outright or creative cloud subscription?
Lightroom is currently sold two ways.
- You can buy Lightroom 6 as a standalone product for $119.99 on Amazon as a direct download. This is the most recent version of the software.
- You can purchase a Creative Cloud subscription for $9.99/month. This means you get Lightroom CC and Photoshop CC (creative cloud) for an ongoing $9.99/month.
This presents an interesting dilemma. Lightroom 5 will be the last time Adobe will release a non-subscription product for either Lightroom or Photoshop. This means you can buy Lightroom 5 outright now, but when Lightroom 6 or any future updates come out you will need to become part of the Creative Cloud monthly membership.
Here is my opinion and what I did. I looked at what it would cost me to buy Photoshop CS6 and Lightroom 5 outright. $119.99 for Lightroom and $900+ for Photoshop CS6 = $1019.99. At $9.99/month for Creative Cloud it would take me over eight years of payments to equal buying the software outright.
Let’s say you buy Lightroom 5 outright for $119.99. Once it becomes outdated you will have to move to the $9.99 Creative Cloud membership eventually. Many photographers would previously pay and upgrade fee each year when the new version of Photoshop and Lightroom came out. Those combined were several hundred dollars. Compare that to $9.99/month and Creative Cloud comes out to be far cheaper, and enhancements are rolled out more often than just once per year.
I’d recommend paying for Creative Cloud, click here to get it for $9.99/month. If you decide you’d prefer to purchase it outright it’s typically cheapest on Amazon for $119.99 – click here to get it on B+H Photo.
Lightroom editing basics
Importing your photos into Lightroom
The first thing we need to do is get the photos from your camera, memory card, or hard drive into Lightroom. There are really sophisticated ways to separate photo shoots, different dates, keywords, and more but that would be too much for this post.
For now I will show you how to import these photos and refer to an excellent training resource at the end of the post.
You have two ways to import photos into Lightroom.
- Click ‘file’ —> Import Files and Video
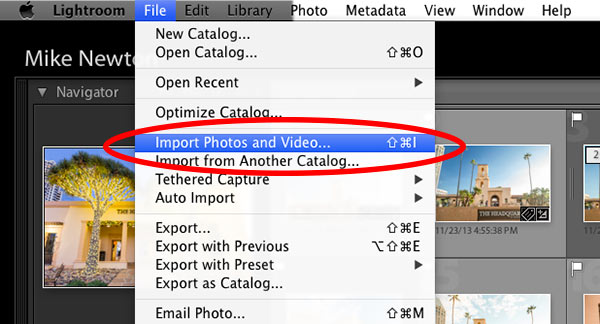
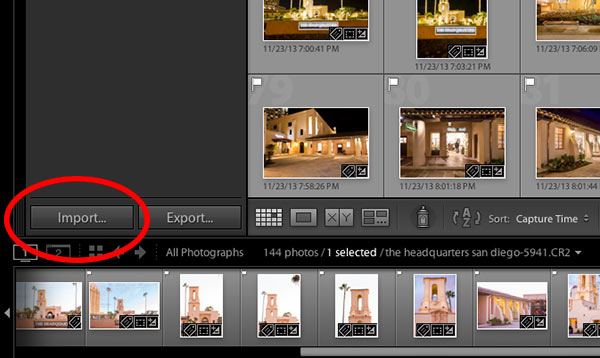
- Click the “import” button at the bottom left of the screen
This will open the import window. You will see all your files show up on the left. Locate your memory card from your photo shoot and click on it. The image previews will start to show up in the middle of the screen.
Select which photos you want to import by clicking them or selecting a range of photos. Selected photos will have a small check mark to indicate they’ve been selected. At the top right of the screen choose the folder you want these photos to be added to, then click ‘import’ at the bottom of the screen. Now your photos will be copied from your memory card to the new folder you selected on your hard drive, as well as be added to Lightroom.
Editing your photos in Lightroom
Now is the fun part! Now that your photos have been imported we get to bring out their best potential. If you are in the ‘Develop’ module, your screen should have the same options as mine below.
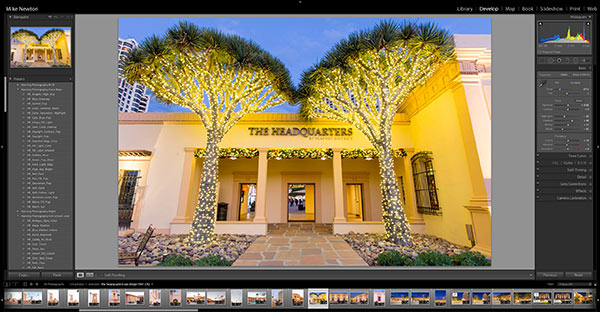
All the magic happens in each of those menus on the right hand side. Lightroom is really simple because all you have to do to make an edit is pull a slider to the left or right. You will see the change it’s making as you pull the slider.
This means you can simple pull each slider left or right until it looks good to you and then move onto the next one. Once you have all the sliders in the position you like, you are done with your edit! Let’s look at each menu.
Basic
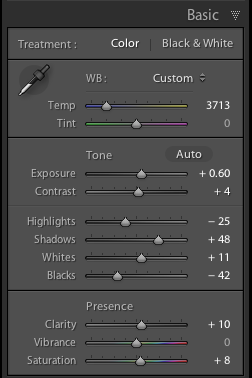
As the title implies, the basic settings are pretty basic! You can change the temperature of the photo if you want it to look warmer or cooler. If the photo is over or under exposed you can fix that with the ‘exposure’ slider. You can add or subtract contrast, highlights, shadows, blacks and whites,
The clarify slider affects how hard the edges of your photograph appear. Don’t go too heavy with this one or your photo will look too processed. Vibrance and Saturation have to do with how accentuated the colors in your photos are.
Tone Curve
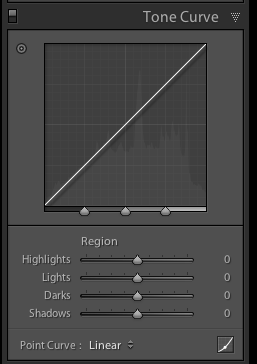
The tone curve enables you more control over the highlights, lights, darks, and shadows in your image. Play around with each of these sliders so you can see how increasing or decreasing each changes the look of your image.
HSL/Color/B&W
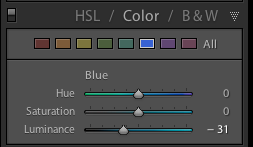
This window lets you adjust individual colors in your image. The HSL tab shows all the colors top to bottom at once, with 2 additional windows to make more changes to each color.
I prefer to work in the “Color” tab which shows one color at a time so you can get each color perfectly. Want the grass a touch greener? The sky a little more blue? This is where you can do it with just one slider!
B&W enables you to convert your photos to black and white and change the look of them here.
Split Toning
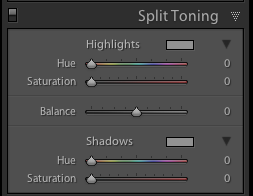
This is a fun area. Split toning means you are choosing different colors for a photographs highlights and shadows. This can give it a very retro/vintage feel to it.
Detail
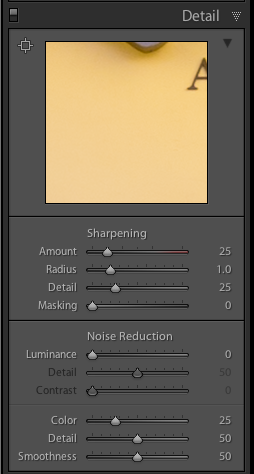
The detail window enables you to have control over showing fine detail in your photos. Sharpening lets to sharpen images (don’t go crazy with this or it will look too processed), while noise reduction helps smooth out noise from shooting at high ISOs.
Lens corrections
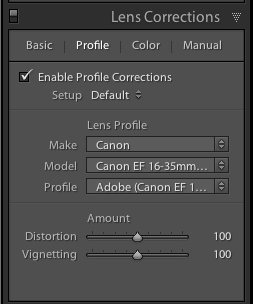
Each lens has slight distortion that can stretch out the image and make it appear there is a slight bulge in the middle. Each lens has different distortion, but Lightroom 5 already has a ton of standard lens profiles saved.
This means sometimes Lightroom will already know what lens you shot each photo with and have the corrections installed! You just need to click ‘enable profile corrections’. Lightroom will either pre-choose your lens, or you can manually choose it. It’s pretty damn impressive.
Effects
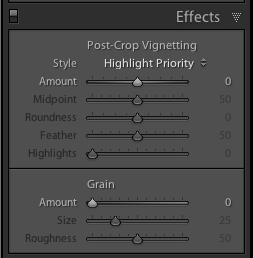
The effects window is pretty simple with two main functions. If you want to include a vignette in your photo (or remove a vignette) the first slider is for you. If you want to add grain to your image you can use the second slider.
Camera Calibration
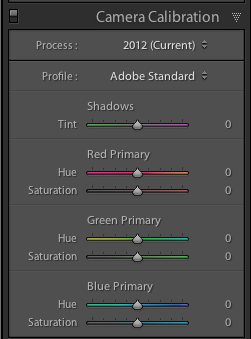
I’ve personally never used this window.
The Lightroom Secret Weapon
I mentioned a secret weapon earlier, remember? I’m going to share it with you now and show you how to create pretty awesome edits in one single click.
Lightroom Presets
It can take a long time to edit each photo one by one, especially when you import hundreds of photos at a time. Lightroom is awesome because once you get all the sliders positioned where you want them, you can save that arrangement of sliders as a preset.
A preset is a pre-saved positioning of sliders. Once you click a preset it will instantly place all the sliders in position. This means that in one click you can create a stunning edit!
Hacking Photography Lightroom Presets
Over the past 7 years I’ve been shooting I’ve developed 100’s of presets that I use for enhancing color, creating sharp black and white edits, creating old school styles, and difficult night photo presets. Check out a few before and after edits below by hovering over the image.
Color Blast Collection
Unedited photo:
After 1-click color blast preset:

Black and White Collection
Unedited photo:
After 1-click black and white preset:

Old School Color Collection
Unedited photo:

After 1-click Old School Color Preset:

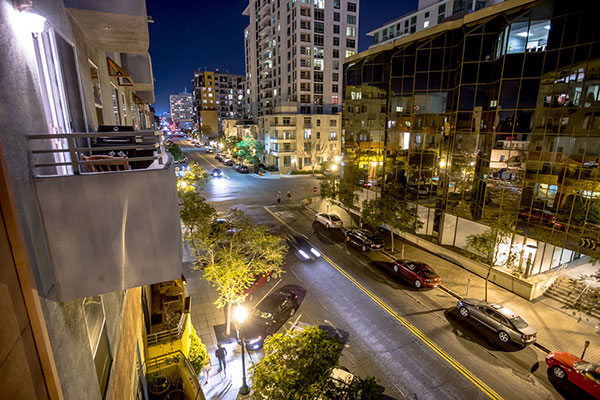
Night Color Collection
Unedited photo: 
After 1-click Night Color preset:
Free gift for making it this far!
Since you’ve made it this far into the crash course, I’m going to give you 12 free Lightroom presets for free!
Click this link to download the 12 free Lightroom presets!

This collection of presets has 3 color-blast presets, 3 black and white presets, 3 old school color presets, and 3 night color presets!
Class is dismissed!
We are almost done with the crash course! Tomorrow we will discuss continuing education. In other words, where do you go from here in your photographic learning?
I’ll show you some of my favorite resources for continuing your learning, whether you want to learn how to shoot landscapes, headshots, families, and more. I’ll see you tomorrow.
Thanks very much for sharing your knowledge with us Mike.
There is always something new to learn and you have taught me a few things I had either forgotten or not considered.
All the best for the years ahead and keep up your enthusiasm!
Thanks Cecilia! Sometimes it helps to go back to the basics, no matter how advanced we get. Thanks for writing!
I wonder how it
Hi, I think you might have not completed your sentence :)