What is white balance?
White balance refers to correcting the color of light so it appears more natural. Light sources come in many different colors. Sometimes these light sources contain color that wash over your subject, changing their color.
Real-life example: using white balance in a bar
Let’s say you are in a dark bar that is lit with oil powered candles that emit yellow and orange tungsten overhead lights. If you are in this room with orange colored light and looked at a white piece of paper, what color would the white paper appear as? Orange. Here is a real example:
This is a photo of my favorite cocktail bar in San Diego called Polite Provisions. I took a photo in the bar and my camera came out with this. The problem is that the color looks awful! Its way too orange and people don’t actually look like that. White balance will corrects images like this.
Ideally we want the color of that little candle light and napkin to it’s right to appear white. We are going to change the white balance to ‘balance the white’ color so it appears more natural. In this case I adjust the white balance after I shot the photo (more on this later) and come up with this:
Much better! The skin tones of the people look natural, the napkin on the right is white, and the little oil powered light is white. Lets take an even better look at the effect changing the white balance of this image has.
Before:
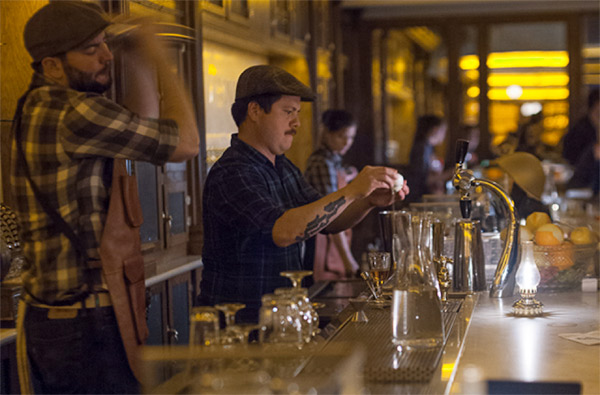
After: 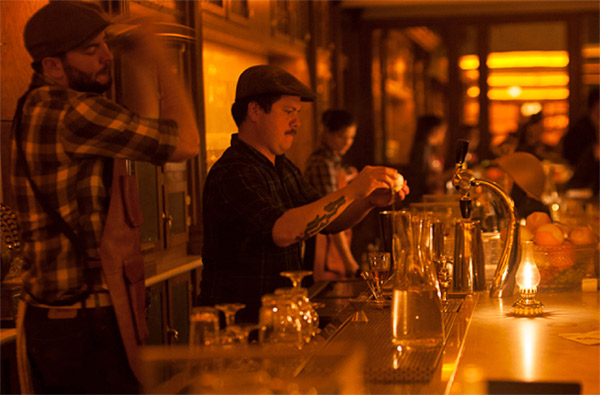
Nerd alert – skip this next section if you don’t care about the measurement of color temp – it will rarely come up.
Color temperature is measured in a unit called Kelvin (K). Kelvin runs from 1000 (red color) all the way up to 10,000 (blue color). Following the chart below we’ll dive into the color temp of typical light sources. Light color covers a broad spectrum.
When to take note of your white balance
For practicality sake you can mostly leave your white balance setting on “auto” and it will get it right most of the time. There are some situations that you should always be aware of your white balance setting though.
Tungsten lights and sodium vapor lights
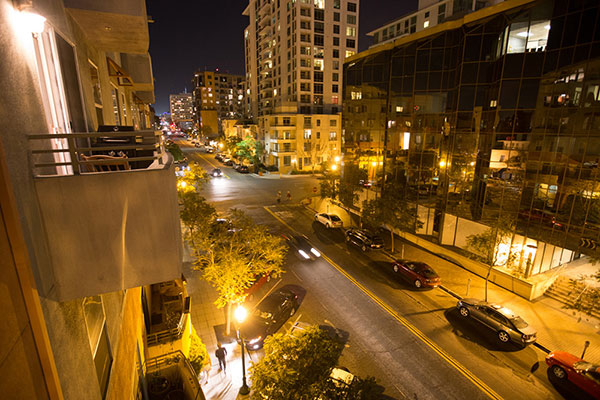
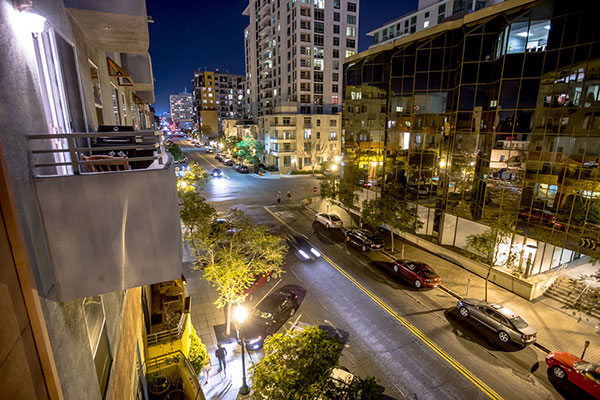
Tungsten and sodium vapor light bulbs (mostly used in bars and street lights) emit a very orange color cast that looks pretty damn ugly most of the time. That gives photos a very pumpkin-like orange color. This is one of the times where I will manually go into my white balance settings and select the ‘tungsten’ settings.
I shot a photo off of my balcony of the street lights which came out very yellow. Just by changing the white balance you can make this look much more natural:
Before:
After:
Florescent lighting
Florescent light is what you find in office buildings and commercial spaces because its very inexpensive. The problem with florescent lighting is that it gives off a green color cast to your images that can make people looks sickly and greenish. Always change the white balance setting in your camera when you are under florescent lighting so people don’t look like aliens!
Changing the white balance settings after you take the photo
The best practice to save time is to try and get everything right in the camera and not during editing. That said we’ve all been there and realized after we shot the photo that we should have changed the white balance. In order to change the white balance after the photo is shot, you need to shoot the photo in RAW
RAW vs. JPG
Simply put, a RAW image captures a ton of data and keeps it intact for making changes later. a JPG takes all that data and then compresses it into a tiny file that strips away all this data. One of the things jpg compression strips away is the white balance data. If you like editing photos and have a program like Photoshop or Lightroom I recommend always shooting RAW. If you don’t like editing and want to save hard drive space then shoot JPG.
Changing the white balance in Lightroom manually
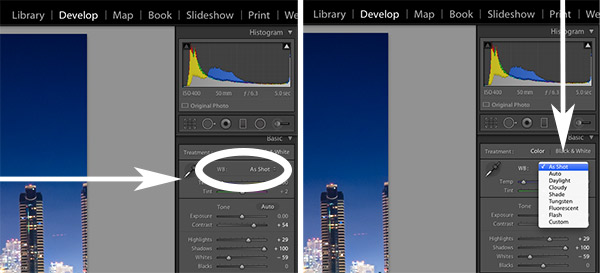
Once of the big advantages of shooting RAW is having more flexibility during editing because you have more information to work with. To do this go into to “develop” module in Lightroom and click to the right of the “WB”. This will bring up your white balance selections so you can choose a different one. Once you choose that Lightroom will adjust the color temperature of your photo accordingly.
Changing the white balance in Lightroom automatically
You can always choose to create presets that adjust for white balance corrections. This way you can simply click one button to edit the photo later. You can also purchase pre-made presets like the Hacking Photography Lightroom Presets that do this for you if don’t want to take the time to create your own.
Tomorrow’s agenda
Class is dismissed! So far we’ve discussed aperture, shutter speed, ISO, and white balance. Tomorrow’s lesson is going to dive into exposure, specifically how to nail the perfect exposure every time. I’ll see you tomorrow!

I like the way you explain the essentials. However, in this lesson, I think saying you need to shoot RAW as the only solution to correcting white balance in a picture file is misleading. Though not perfect, there’s some leeway to adjusting off-white balance with regular JPEGs, wouldn’t you say?
Hi Lance,
Thanks for the comment! I don’t see in the article where I say that shooting in RAW is the only solution to correcting white balance – am I missing something?
You are right, you can make some small changes to fix white balance on a JPG in Lightroom by adjusting the temperature, but JPG doesn’t give you much room before the image looks a little off.
To quote the post, “One of the things jpg compression strips away is the white balance data.” This is accurate. One can still change the temperature of a JPG in LR somewhat, but the actual white balance settings are removed.
“If you like editing photos and have a program like Photoshop or Lightroom I recommend always shooting RAW.” Note I didn’t say “You need to shoot in RAW”, I said “I recommend always shooting in RAW”. This is the way I shoot, and what I would recommend to people like me who enjoy spending time in Lightroom. Shooting RAW gives you far more options and far more data to make changes after the shot.
“If you don’t like editing and want to save hard drive space then shoot JPG.” This seems to be the mentality of a lot of my photographer friends who prefer shooting JPG. They don’t want to do much editing so they prefer to quickly shoot JPG, especially to save space.
I hope that clears up any confusion!
Brilliant! Thankyou! Enjoying this crash course as I’m trying to learn more every time I shoot.
Thanks Julia! I’m glad you are having fun!