Welcome to the first day of the photography crash course!
Hi, I’m Mike Newton. I’ve had a camera in my hands since I was 12 years old. I picked up an early model digital point and shoot camera when I was 22. It took 2 long years before I realized I needed more control over the camera and bought my first DSLR camera. I was hooked. It only took about 3 months to shoot 6000 frames as I consistently experimented by making as many mistakes as humanly possible to learn from them.
I’ve shot everything from commercial work for companies like Miller- Coors, publicly traded real estate conglomerates, weddings, senior portraits, restaurants and bars, and events that have been syndicated around the world through the Associate Press. I still think shooting off the cuff is when I’m really in my element and the part of photography I most enjoy.
My Mission
My mission is to help newer photographers skip the typical 10,000 hours (hat nod to Mr. Malcolm Gladwell for that reference) it requires to get really good and break down some of the ‘hacks’ I’ve found through my own trial and error that should save you a ton of time.
This 10 day crash course is designed to take you through the basics (and not so basics) of beginner photography. By the end of this course you will have a great understanding of the building blocks of how to create great images. With that said, lets get started.
Day 1: What is aperture?
Lets dive into one of the most misunderstood aspects of photography and clear this up right at the start. Aperture is how big the hole in the back of the lens is. That’s it.
The aperture of your lens is just like the pupil in your eye. When its really bright out, your pupil shrinks because it doesn’t need to let as much light in for you to see properly ( to get the right exposure). When it’s dark out, your pupil gets bigger to let in more light so you can see properly (get the right exposure). Follow me so far?
What the hell does that f-number mean? (f/1.8, f/1.56, f/8, f/20, etc)
You’ll hear people talk about the “f-stop”. Lets cover this 2 ways: easy and hard. I prefer the easy way:
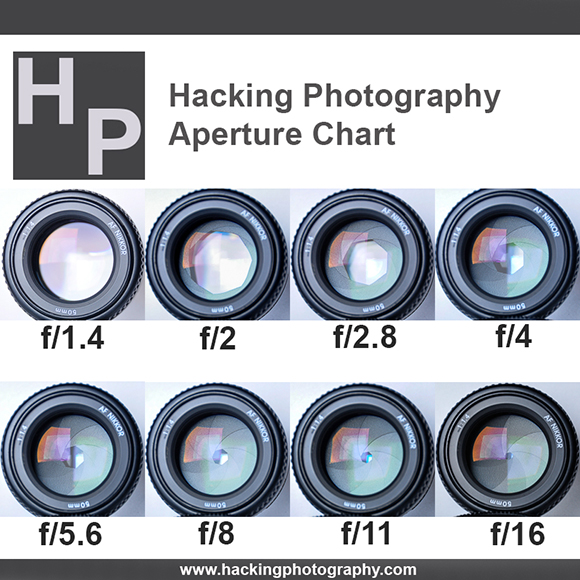
Aperture Chart
The F-Number
is a number that represents the size of the lenses aperture. A smaller f-stop number means the opening inside the lens is bigger which lets more light in. One would think a smaller f-number would mean a smaller opening, thus a smaller aperture. The opposite is true. Think of Aperture measurements like the gauges of earrings or gauges of wiring; a smaller number means a bigger hole. Here is a chart to hopefully cut through some of the jargon:
Note you cannot see any blades through the lens in the first photo (f/1.4). This is often referred to as shooting “wide open” because there are no blades blocking any light. This means a lot of light is passing through the lens and creates a small slice of focus. This is perfect for a portrait in which you want a persons face to be in focus, but the background blurred out.
On the complete opposite end of the spectrum, the last photo at f/22, has a very small aperture. Note the blades are almost all the way closed, which only lets a small amount of light through. This creates a very large slice of focus, meaning everything from the front to the back of the photo will be in focus. This is perfect for a landscape photo in which you want everything from the foreground to infinity in the distance to be in focus).
Your choice of which aperture ultimately controls the depth of field (DOF) of the image, or how big the “focus zone” is. Think of aperture as how deep the “slice of focus” is.
WHAT THE HELL IS LENS SPEED?
Lens speed is not how fast the shutter can close. A lens with a smaller f-number/bigger aperture allows more light to pass through the lens to the sensor which can allow for a faster shutter speed to be used.
If you put your camera on aperture mode (spin the dial to top dial to “A” on Nikon and “AV” for Canon), it means you choose the aperture selection and the camera chooses the correct corresponding shutter speed to create the correct exposure. So a if all settings on your camera stay the same, a f/1.4 lens will allow you to use a much faster shutter speed than a f/3.5 lens because more light is able pass through to the sensor. A lens with a bigger f-number/smaller aperture allows less light intensity to pass through the lens to the sensor, which means a slower shutter speed would be used.
Take a look at any lens, and you will see an f-number. These numbers tell you how fast the lens is by showing you how big the aperture/small the f-number of the lens is.
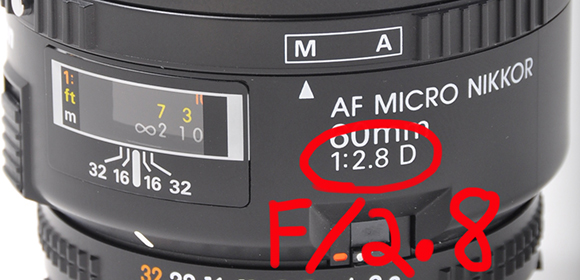
Constant aperture of f/2.8 throughout the whole lens
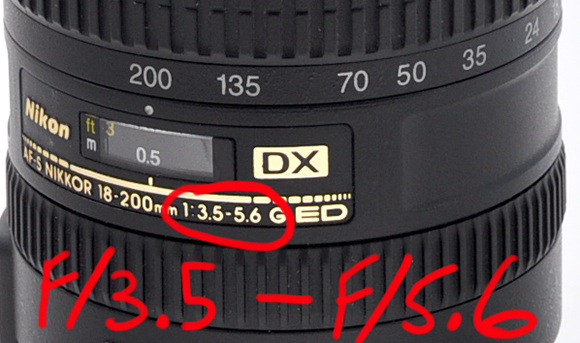
Nikon 18-200mm lens showing an aperture range of f/3.5 – f/5.6.
Fixed or “prime” lenses are lenses that don’t zoom in or out – they are fixed in place. Because the internal mechanics are simpler, they can typically be made to be very fast like the amazing 50mm f/1.4. The faster the lens, the higher the price because it lets you get better photos in low light and a shallower depth of field.
When To Consider Your Aperture Selection
- When you want to control the depth of field (DOF) of your photo – the how shallow or deep the slice of focus is.
- When you need to shoot in available (ambient) light – typically shooting in darker environments.
Controlling Depth of Field with Aperture
When you put your camera on Aperture Priority mode- (the “A” dial selection on Nikon, the “AV” selection on Canon) you choose the aperture and the camera chooses everything else to get the right exposure. Basically “I choose the aperture, the camera does the rest”.
The DOF will tell the story of your image. If you want to draw attention to a specific part of a photo, use a shallow DOF and focus on what part of the image you want to get the most attention. Remember that the bigger the aperture (hole in the lens) the shallower the depth of field. The smaller the aperture the less the depth of field.
Here is a photo I shot of a tiki cocktail during a food shoot for a bar in San Diego.
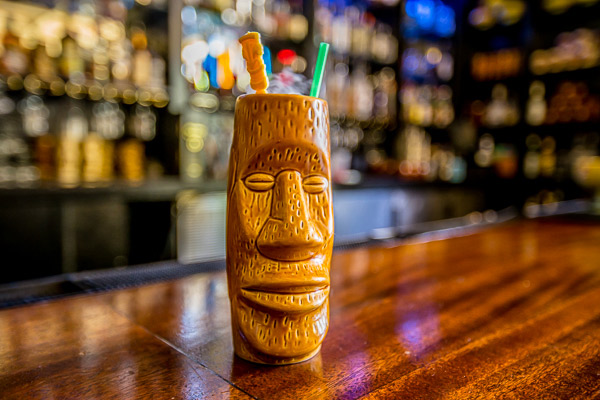
I shot this at f/2.8 to blur the background so the viewer could totally focus on the drink. Can you see what I’m talking about now when referring to the ‘slice of focus’? This big aperture/small f# shot is creating a slice of focus that is about 4 inches deep. That is just enough slice of focus so the drink is crisp but the background starts blurring out right after the drink.
If I had shot this at f/20 vs. f/2.8, all the bottles in the background would be in focus and be be distracting.
Shooting in Available Light
If there is not a lot of available light (ambient light) you will need a faster lens with a bigger aperture available (smaller F# lens). Going back to the pupil example, when it gets darker your pupil has to get bigger to let more light into your eye so you can see. When it gets darker, your camera needs more light to properly expose a photo.

You have 2 choices to get more light into your camera- aperture and shutter speed. Each affects how much light makes it to your sensor. To get more light in, you can either increase aperture (use a smaller f-stop number) or you can slow your shutter speed to let more light in while the shutter is open.
Use Aperture to Get Clear, Sharp Photos in dark areas
You may have noticed that if you shoot a photo in a dark room without a flash images can come out blurry. This is because to get the right exposure, your shutter has to stay open longer to let more light in. If someone or something moves during the shutter being open it creates blur.
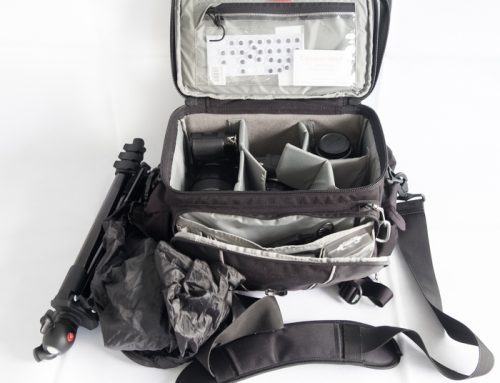
This can also happen if you are hand holding the camera instead of using a tripod – its physically difficult to hold a camera for more than 1/25 of a second without moving. A lens with a bigger aperture gives you the option to speed up the shutter for hand-held photos. This photo was taken in a really dark room and would have likely had blur from the guitar player moving had I not been able to shoot it at f/1.4 which let me get a shutter speed of 1/60 seconds to freeze him in place.
Alright class, day 1 is dismissed!
In tomorrows crash course we will dive into shutter speed. What it is, how to use it, and give you some cool examples of how you can use it creatively.
[…] “What is aperture?” Part 1, we covered the […]
Dear Mike,
This article helped me alot but I faced some problems regarding aperture because I took photo of group of 5 people at f 1.8 but the image blurred most left and right person. Why this happened?
Hi Shahrukh,
Thanks for commenting! Let me see if I can help.
Would you be able to post the photo here so I can take a look at what is going on?
When you shoot at f/1.8 the depth of field will be very narrow, meaning the slice of what is in focus might only be a few inches deep.
Lets say that the group of people is arranged left to right. I’m assuming the people on the far left and far right of the image are standing slightly closer to you compared to the people in the middle of the photo. If you focused on the people in the middle of the photograph, the people standing slightly closer to you would be out of focus because they are not within that narrow slice of what is in focus.
You covered everything about this subject in a really through way. I’m not surprised, you always do. The chart on Ap/F# is great because it’s often the terminology that gets confusing to us armatures. Great job.
Hi Lestlie,
Thanks! I’m glad I could help keep it simple – I tend to learn best that way too!