This guest post was written by Hacking Photography subscriber Chris Simmons. Check out more of his work and connect with him at http://www.facebook.com/chris.simmons.54584
How I got started with photography
I’d class myself as an inquisitive photographer who’d really like the time to become ever so slightly obsessive, but in reality I’m not ready for that level of commitment whilst also earning a living as an Engineer and Designer of household goods. To that end, I realistically shoot on average around eight times a year with any conviction.
I started photography some 30 years ago with a Ricoh 35mm KR10 Super camera and a f/3.5 – 50mm prime. My brother in law at the time gave me my one and only photography lesson which involved the following:
- ‘look in here and twidle this to get it sharp,’
- ‘turn this to keep that number above 100,’
- ‘have something in the front, the middle and the back,’
- ‘use ISO 100 film for outdoors, 200 for indoors and 400 if your desperate.’
Armed with this information I happily shot away until the advent of digital.
Moving from film to digital
On my 40th Birthday my wife and friends got together to buy me an HP bridge camera and the world changed a little, all of a sudden your images grew from 6″ x 4″ to a 21″ cad station monitor, and no longer did things just go into an album. Though I loved the digital age, the bridge camera quickly became annoying as it focused where it wanted. Although the short lesson from my brother in law was still a whisper in my mind, I had inadvertently began to create some better composition and exposure rules over the years.
Digital cameras were not cheap and certainly Digital SLR’s remained out of my budget for a few years. February 2010 I took the plunge with a Canon 500D with 18-55 kit lens plus a 75-300 zoom which came with the offer. I happily went out with this 15.1 mega pixel camera shooting anything that interested me. In April 2010 my wife bought me a subscription to a digital camera magazine which is where I first came across blue hour photography.
Introduction to blue hour photography – a few examples
Blue hour photography refers to the hour after sunset, in which the sky starts turning blue and creates beautiful colors.
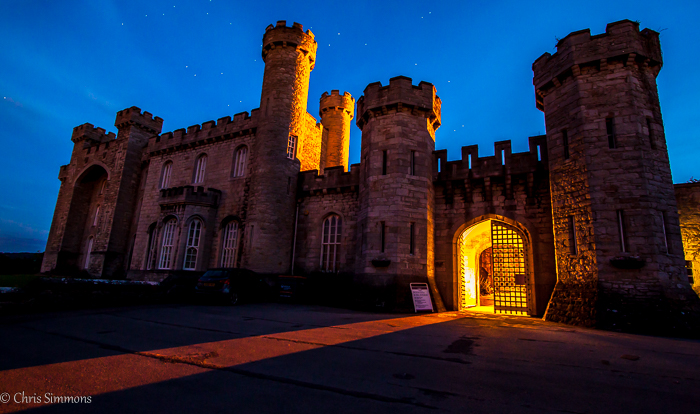
Bodelwyddnn Castle Hotel – North Wales – August 2013 – Canon 500d – Canon 10-22 f3.5/4.5 (10mm f6.3 iso 800 25 sec, manual focus to the doorway live view)
I loved the colours that came up on the screen in this photograph. Controlling highlights was a bit of an issue but the blend of the cold blues and the warm yellows just blew me away!
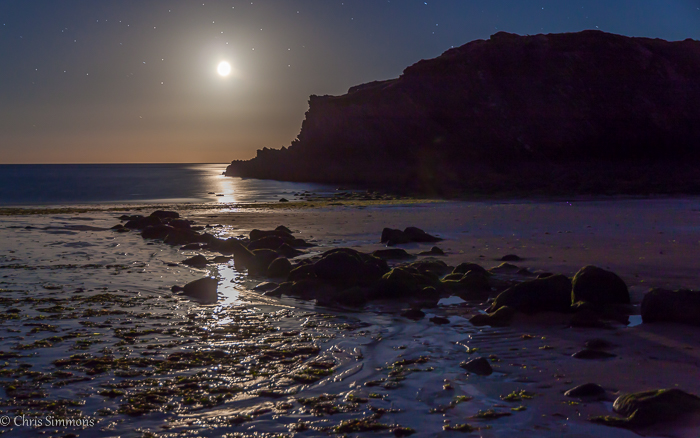
Porthdafarch Bay – North Wales – August 2013 – Canon 500d – Canon 15-85 f3.5/5.6 (15mm f6.3 iso 200 30 sec, Infinity focus)
On the way back from a holiday we were walking back to our accommodation by full moon light, I’d never tried shooting in the dark, we set of for the beach with camera, budget tripod a very dodgy low power torch and half an idea about shining the light on a rock to focus.
Even if you are used to being outside in the dark, knowing your camera is a must! Buying a headlamp and a separate small CREE flashlight is a good investment, although neither were available on this shoot and as such I fumbled my way around the camera under a phone light.
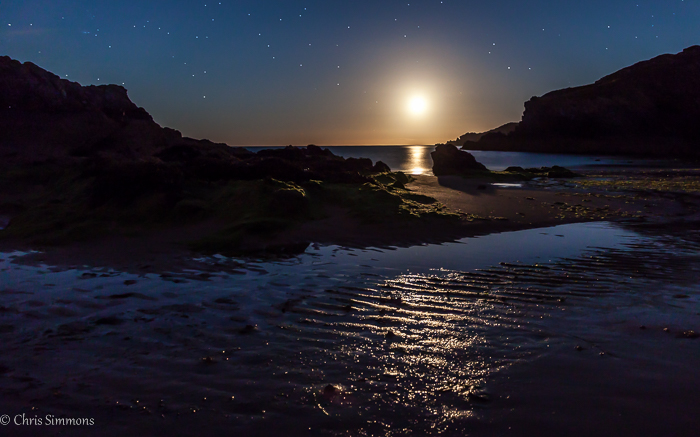
Porthdafarch Bay – North Wales – August 2013 – Canon 500d – Canon 15-85 f3.5/5.6 (31mm f4.5 iso 200 30 sec, Flash lamp focus to the shore rocks)
Through trial and error I had stumbled onto a hyperfocal distance, or near enough of around 12.5 meters, I like what came out and I began to read up on general photography principles.
With a some constraint, and a little more knowledge, I improved my manual focus technique using the live view 10x magnification in conjunction with the depth of field preview button found on Cannon DSLR’s.
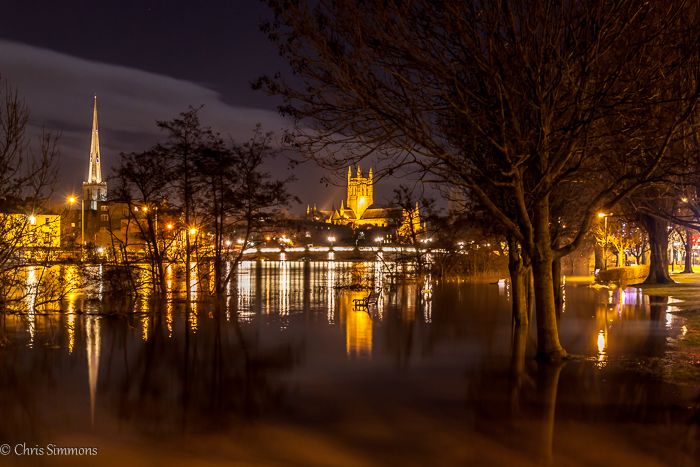
Worcester Floods – UK – February 2014 – Canon 500d – Canon 15-85 f3.5/5.6 (31mm f10 iso 400 15 sec, unassisted live view manual focus in combination with the DOF preview button)
In 2016 I have shot a few more frames and believe that I finally have a reasonable workflow. Originally I would shoot and record where I went. Now I go somewhere to shoot at least one of a planned set of specific shots depending on weather conditions and then either add supplementary frames or adapt as needed.
I aim to have a good basis of understanding before I leave for the shoot and will often set my camera to the predicted settings before leaving the house. People find it strange that I do this, but I find almost nothing about photography instinctive. There are so many things to consider! With a plethora of opportunities to get it wrong and only a few to get it right, I like to give myself the best opportunity so that I’m not working completely blind :)
Three steps to excellent blue hour photography
I break my photography into three elements
Step # for great blue hour photography: Planning, planning, planning!
I keep a file full of places I want to shoot and options of the shots I think I am capable of achieving. Invariably it will contain times of year where the sun, moon, and Milky Way could look great along with high and low tide options. If I am going away for a holiday then I would aim to have a couple of locations picked out and researched.
For this particular shot I wanted something to celebrate the winter solstice of 2015, which occurred on Tuesday December 22nd. The full moon was scheduled for December 25th so any clear weather forecast in that timeline would be perfect to capture the full moon at its peak.
The location I picked was the Worcestershire Beacon, the highest point on the Malvern Hills range. This runs North to South, with the beacon being in close proximity to the Iron Age fort known as British Camp (built circa 1056-66.)
I wanted a shot that I could capture the last light in blue hour from the setting semi western sun, along with the moon rising generally in the east.
Some Helpful technology
![]()
Planit Pro App – VR view – Image showing sun and moon plus angle required.
I used the Planit! Pro app (iTunes App Store, Google Play Store) which costs $5.99 but is really helpful.
Ideally I like to be set up before sunset on the of chance that I might be able to create both a sunset shot, plus a moon shot. I can then blend the two together. The image above gives me a rough idea for the angle to include both options of shots. I took other screenshots for later times, the point being to have an understanding and not to be rigidly fixated on one frame option.
I tend to shoot panoramas with the camera in portrait mode as I find you get a far more balanced height to width ratio.
![]()
Planit Pro App – VR view – Image showing panorama requirements
The sweep shows a minimum of three frames but generally I rotate around 20-25 degrees. The more frames you have the better it joins together in the final composite, and if you occasionally have a frame that doesn’t stitch correctly you can crop or discard it.
![]()
Hyperfocal App – free (Google Play / Itunes – this is a different version but still free)
In an ideal world I would have shot in daylight with a longer lens still in portrait orientation. The reason for this is that wide angle lenses can leave you with some tiny details you may not want in the back of the image.
By using a longer lens the mid ground is compressed and the details in the distance look closer. To achieve this you may need to go to F18 and beyond to create an acceptable DOF. In the low light of this shot, shooting above f/2.8 would just increase the time or the ISO needed for the proper exposure. In this instance my compromise was to go wide.
You may have worked out that I love the Hyperfocal Pro app. Hyperfocal distance had me confused for a couple of years, but effectively you can ensure that a lens is always in focus at a specific aperture and focal distance (mm), not just where you are pointing it. For my purposes, a hyperfocal distance can be calculated at a certain aperture and mm that will give sharp focus from a near point to infinity when the lens is focused on an object at a specific distance. In this instance if my primary focus point is 3-3.5 meters away then the frame at f/2.8 will be in sharp focus from 1.7 meters to infinity. I find a lot of people just set their lenses to infinity but at f2.8 you will be sacrificing foreground detail.
Step #2 for great blue hour photography: The shot itself
Three ways to physically shoot pano shots
- If you hold the camera and shoot whilst rotating from the hips/shoulders it does work but don’t have anything in the near ground. This is because your centre of rotation is around your shoulder blades rather than your camera sensor and that basically messes up the alignment. Also expect to have some serious cropping issues using this method.
- Shoot using a tripod with only roughly leveled legs and roughly leveled camera body. Expect some cropping but try not to have too much foreground detail, otherwise it can cause alignment issues.
- The third option is to really take some time setting up the tripod legs and the body. Having a pistol grip means I set the legs, then the leveling base, then the camera using it’s in-built level. If your camera has an in-built level then I recommend that you first check it’s accuracy at home before you leave and if it is pretty accurate turn it on and check the level through the entire sweep of your panorama (hot shoe levels are available but do check them before you shoot with them).
You can buy a piece of kit that effectively puts your camera body on a slide action that allows you to position the camera body so the centre of rotation sits on the face of the sensor, that way all items within the shot will align absolutely perfectly but for my level of skill and knowledge it is a complexity beyond my requirements.
The setup for the shot
The Beacon is only around 1400 ft (425 meters) but it is the highest point for a couple of hundred miles in two directions. If the wind is coming from either side then generally it gets a bit fierce, not unsurprisingly as I reached the summit I was hit by winds I judge to be around 50mph! I was struggling to stand so letting go of the tripod was not an option.
My tripod setup
I have the Manfrotto 055CXPRO3, attached to that is a Newer Pro leveling base, followed by a Panoramic Indexing Rotator with a Manfrotto 327RC2 pistol grip head. I like the pistol grip but it doesn’t have a panning collar so as I wasn’t prepared to part with it or carry another head, I bought a separate panning collar (Panoramic Indexing Rotator).
Using the app coordinates and generally just moving around I found my position for the shot which gave me the correct hyperfocal settings. I crouched down to my desired shot height and with the camera in portrait mode found my primary focal point, try panning through the shoulders in both directions to have an idea of the total image.
In the strong winds I extended all three legs and opened the angle to the second leg position so that it has a good wide stance, making certain that the legs had a good purchase/grip. I kept the central column down (actually I would have to be desperate to lift the central column ever as it is a lot less stable). Some tripods allow you to attach a hook and then weights but I have found that in strong winds the weights can rock and often I just vote for keeping a constant pressure on the top of the tripod legs, not ideal as you wouldn’t touch the tripod at all if possible.
Getting the tripod level
As this is going to be a pan shot then you need to get the tripod as level as possible. I roughly adjust the legs so that the bubble is as accurate to centre as possible. I normally drop all three legs around 2″ (50mm) before I start, it ensures that you can always move the heights in both directions.
Some people get confused when adjusting the legs. Stand with one leg on either side of the leg below the bubble. You can now consider the leg you are straddling adjusts front and back, and the other two control right and left. Effectively the bubble doesn’t move and you move the tripod that is underneath it. When you consider that you are either pushing the tripod towards the bubble or pulling it away, then moving in the right direction can be a lot easier. If you have a leveling base it is a lot easier to fine tune your assembly.
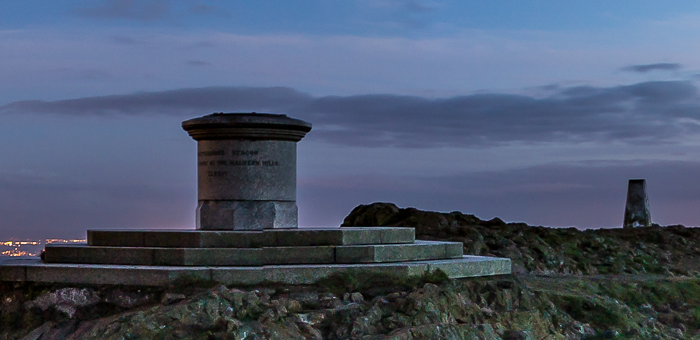
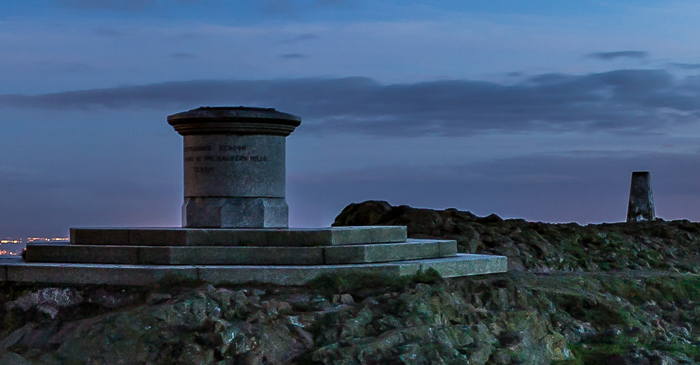
Getting the composition right
Frame your primary subject/s. For this shot I had the moon and also the granite carving as my main subjects. Do a trial pan your shot and look for lead-in lines and areas of light and shade. Above all, allow plenty of space around your composition as you will lose some of the area in post processing. This shot will be around 200 degrees in total including the over shot area.
Technically I could shoot this on three frames with this lens but I actually took ten frames with around 25 degree separation. I try to ensure that I don’t cut any primary focal point objects in half, they can have a tendency of confusing the stitching software I use to put them all back together.
Focusing during blue hour photography
When using a tripod I pretty much always focus in manual. I set the camera for mirror lockup, switch all the lenses I will take with me to manual focus, and disable any stabilization on the lenses. Too often in the past I’ve forgotten to put the lenses on manual focus, only to throw the focus into a mad hunting exercise in the dark, or worse still introduce a sort of motion shake. This ruins the shot while the non moving lens tries to compensate for a lens that it assumes to be moving slightly.
Initially I will dial in a rough focus with the viewfinder and then switch the camera over to live view, position the metering/focus square to my theoretical focus point and manually focus. I then shift the view back, keeping the area illuminated with the flash light to check focus (I’m shooting at f/2.8 and the lens max aperture is 2.8 there is no advantage checking DOF focus preview as the lens will not step down. In daylight conditions this is a worthwhile exercise.
Blue Hour ISO selection
If I’m in blue hour I always start at ISO 100 which for my camera is it’s best/lowest ISO. I had my shot DOF calculated for F2.8, in aperture priority. I took a meter reading over the extreme of the frames – the left light area, the darker granite section, and over the moon and city lights. I switched to manual, exposing for the moon and city lights but I left the granite too dark. To correct this underexposure, I exposed for the granite slightly under exposed and blew the highlights a little on the moon eventually settling for a 3.2 second exposure.
Minimizing shutter movement for long exposures
Normally for short exposures I’d use a cheap Infrared release, but as this had died in the cold I reverted to the 6 second timer. When you buy a tripod there are many considerations. For me two important ones are the general stability, ie will it hold the camera and lens without bending! Generally they all have a Kg rating so that is easy to find out.
The second is it’s ability to dampen vibrations. My first test for this is to go to the camera shop and put my kit on their tripod, I put my camera facing outside their door or window then focus on something distant and view that distant object at 10x magnification now look at the edges and look for a slight movement. You will be surprised at how much movement some tripods have, even though they are rated in excess of your equipment.
The second test is to tap one of the legs of the tripod with your hand and count how many seconds it takes to come to rest at the base vibration. This determines how long you will need your delay to be from touching/impacting the camera to the time that the shutter can fire. I appreciate that in live-view, the mirror will already be up. If live-view shuts down between shots you are still protected by mirror lock-up, particularly if you are shooting brackets.
Shooting direction
I normally shoot from left to right. I’m not sure whether Lightroom considers file numbers but they tend to take longer to stitch than those that are shot right to left. Certainly on the previews you can see your image stacked together more easily if you shoot left to right.
Post Processing
I always group my shots on Light room as soon as I up load them. If you have shot a few groups of images as brackets it is far easier to control the files this way.
Stitching the shot
Before stitching I recommend shutting down everything else on your machine. Since stitching can take a lot of CPU resources this makes it all happen a lot quicker. In theory you can highlight all of your photo groups to be stitched, right-click, select ‘photo merge,’ ‘Panorama’ and the whole thing will just get on with it.
in reality if you have a complex image with many frames it may just return an error message and you could think the whole shot is ruined. I find that the software actually learns if you select the first three or four and proceed to the Panorama Preview it will build the preview. You can then cancel and increase the selection by say two frames, then keep doing this until all your frames have built into a preview, then press ‘merge’ and go away and do something else for a while while the computer processes the image.
![]()
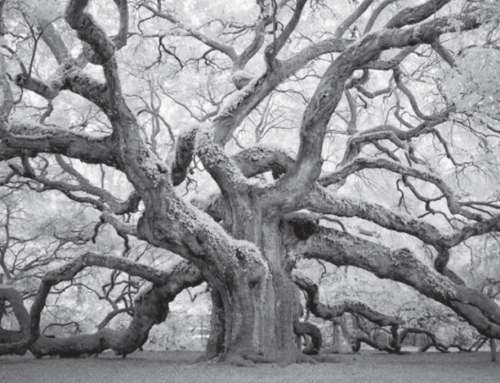
You’ll end up with an image similar to the one above. Note the curved sections on either end: this is why you need to shoot wider! The image here does not have ‘restrain crop’ selected so you can see the effect.
If you cut a primary object in half while panning you can get a bad join (see centre bottom step). You can either remove the frame (if you have enough overlap) or you can crop the section out that is causing the problem.
Fine-tuning your blue hour photography
My processing starts as follows: drop the highlights to -100, increase shadows to +100.
With the curser on the whites slider, hold the ‘Alt’ key to reveal the whites mask and move the slider so that just a few coloured /white dots appear, do the same with the black slider and move the slider so that just a few dots appear of colour/black. This helps find the white point and black point of the image.
Set the exposure to a nice balanced level, in this case+1.00
The above is my starting point for all images.
Correct the colour temp in this instance to Cool the colour temperature a little to 6250, this just pulls a truer colour and removes a bit of the muddy look.
Now you need to start to boost the frame, to separate the layers and create some isolation. I wanted the granite to look completely separate from the cosy town below, so I boosted clarity +70, vibrancy +40 dehaze+25 to add a little saturation and show some nice textures in the mid tones.
The highlights had dropped too far and I wanted the colour gradient to pull back in, so I added some highlight again, as well as dropped the contrast and saturation a little to keep it looking fairly real.
Sharpening is the final stage. I zoom into the sky at 1-1 ratio at a mid-blue tone and check for noise at that point. It isn’t too bad so I put a level of 30 and a radius of 1.
The mid-ground rocks lost quite a bit of detail and the silhouette edges in the mid-ground had softened so I put 70 of sharpening which crisps everything up but throws a lot of noise back in.
Hold down the Alt key and with the cursor on the mask slider and move the slider to the right to activate the mask. Initially everything is white which means that everything is sharpened, as you move the slider, black is introduced which indicates unsharpened areas. You just want the contrast edges to be sharpened so the cloud edges should be fairly soft but the rocks quite sharp.
Now I checked for sharpening halos which appear as buzzy edges between the light and dark areas, at this level they weren’t too bad.
Clarity and dehaze can also cause a halo so a small amount of brush work with a small brush and a large feather at about 75 flow with a slight drop of clarity normally fixes those areas.
The moon had been sitting behind the clouds which had allowed the stars to be quite visible on the night but the editing of dropping the highlights had meant they had disappeared a little. With a one pixel brush and a one stop increase of exposure I dotted in the centre of each one to lift them back up again. I used an opacity of 25, a single dot for the weaker ones, two for the mid, and three taps for the brightest cause a more realistic view i think.
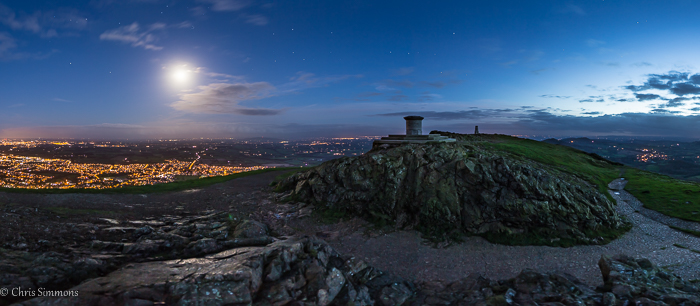
So this is the finished frame, I hope you like the image and find my techniques useful in the future!
Great in depth article. I love all your tips! Blue hour is one of my favorite times to shoot, but unlike you, I never get any stars in my shot… after looking at your settings I am seeing that your aperture is more open than I usually shot with during blue hour. I can’t wait to go shooting this weekend and play with my aperture to try to capture some stars during blue hour.
All I can say is Btilliant, both in images and the write up.
Thanks for sharing.
Incredibly detailed Chris. For anyone who really understands everything you referred to. I don’t but I know enough about some of it to get a real insight into how you achieved this marvellous image. Would have to keep my wits about me if I was to emulate the effect though. Excellent tutorial.
Really interesting article. I wish I had as much patience as you though which is probably why I don’t do much pure landscape. Good tips on autofocus. It does get confused in low light.
Thank you very much for sharing your great personal experience.
Love your post. Very useful.
Chris
Fantastic article! Can’t wait to try a few new apps and strategies you’ve outlined.
Karen
Thank you for this article, it opened up my eyes and answered a few of the questions I had.
super terrific
Superb! When I grow up I want to be like you..and I am already in my mid 50s. I appreciate all the details, you must be a teacher or writer as well as a photographer. I will be using some of your techniques in my upcoming trip. Thank you!
Great article, Chris. I really appreciate the detail you include along with your suggestions and reasoning for the changes/settings you make. Beautiful photo, too!
I’m glad you enjoyed Chris’ article, he is very talented :)
Thanks all for the feedback, always good to know that a few people got something out of it.
Incredible….thank you for sharing your tips and gorgeous shots.