I’ve been finally getting out of ‘commercial photography mode’ and getting back into shooting personal work for fun.
Its really easy to let your personal work fall by the wayside when shooting as a job so I’ve made a conscious effort lately to get back out there. After talking with my wife, we decided to go do a beach fashion shoot.
Leave home for the beach fashion shoot: 6:45pm PST.
One of my favorite things to photograph is my beautiful wife Dominique! She runs a style blog called Somerstyle in which she posts about fashion ideas, clothing styles, and more.
It works out really well that I happen to be a photographer, she needs images for it, and she enjoys being in front of my camera! For this beach fashion shoot she wanted to post about wearing fashionable jackets at the beach for those San Diego days that its slightly cool out.
She picked out the outfit, I grabbed my Sony A7 camera and Zeiss 55mm f/1.8 lens, and we headed out the door.
We decided on Coronado Island, which is only about a 5 minute drive away from us (pretty rad, I know :) We easily found parking and started walking to the beach. There were a few different areas to work with so that gave us plenty of options.
The rock barrier: 7:03 pm PST.
As you enter the beach, you cross a huge barrier of massive rocks. After moving past these rocks we decided to use them as a background. I asked Dominique to stand in front of these rocks so the sun was hitting her from camera left.
Notice I’m using the rule of 1/3’s to place Dom on the right 1/3 vertical line.
Before photo straight out of the camera:
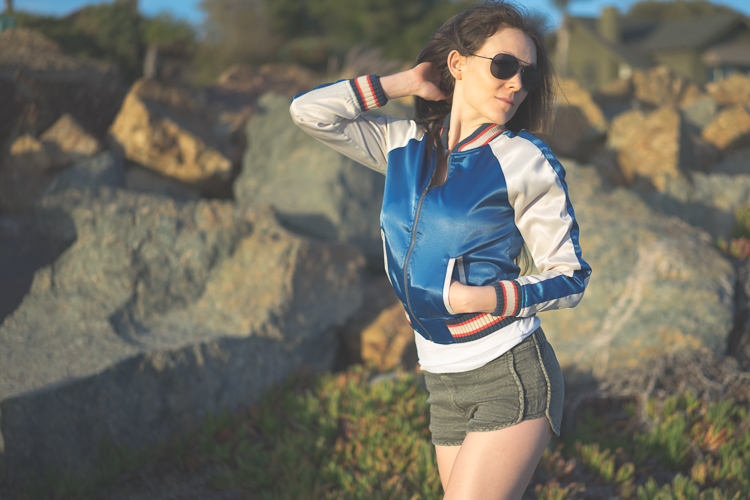
After Lightroom editing:
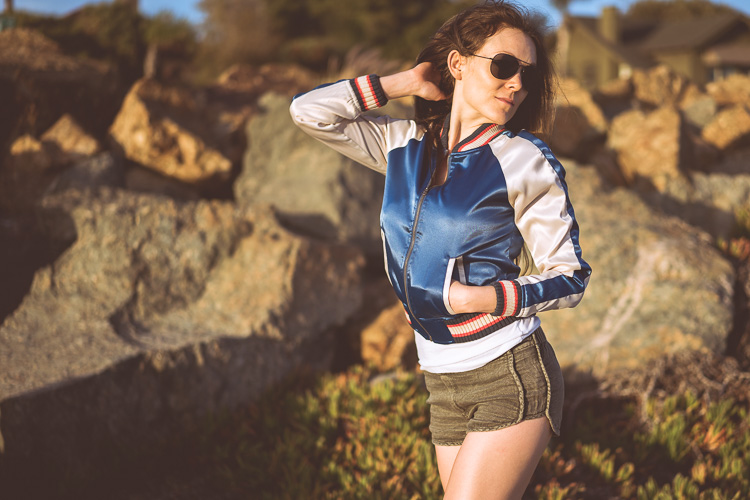
1/125, f/1.8, ISO 50
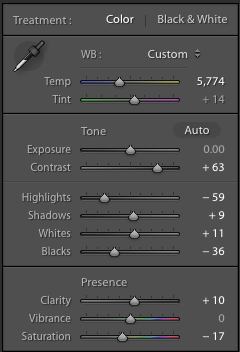
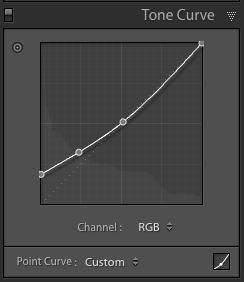
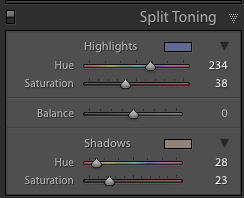
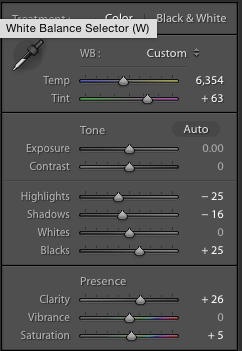
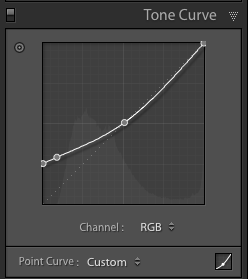
I edited this image by pulling up the contrast quite a bit and lowered the highlights to smooth out the light. I then dropped the blacks so they were less punchy, and lowered the saturation. I created a custom tone curve to make the blacks a bit more grey, and then added some split toning to create some more ‘beachy 1970’s’ color.
The sand trail: 7:04 pm PST
I turned to my left and noticed the Hotel Del Coronado in the background so we decided to use it as a backdrop. Dominique stayed in place and I simply moved to her left side to get this new view.
The light was now starting to come down pretty quickly which produced nice long shadows. I placed Dominique so the trail would help lead the viewers eye to the hotel in the background.
Before photo straight out of the camera:
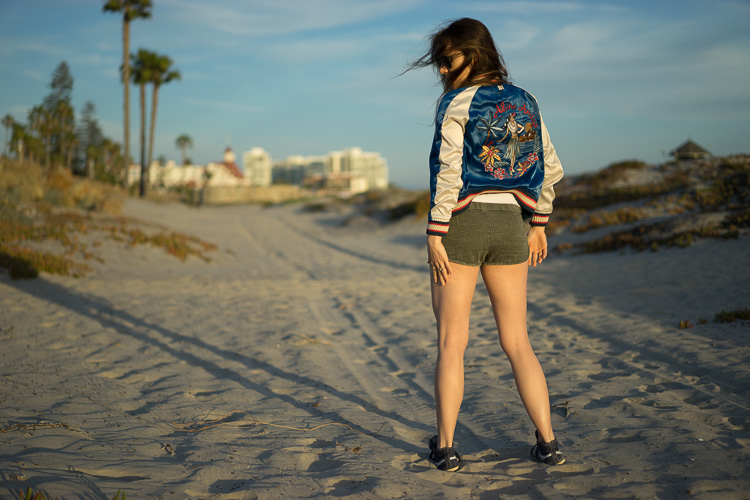
After Lightroom editing:
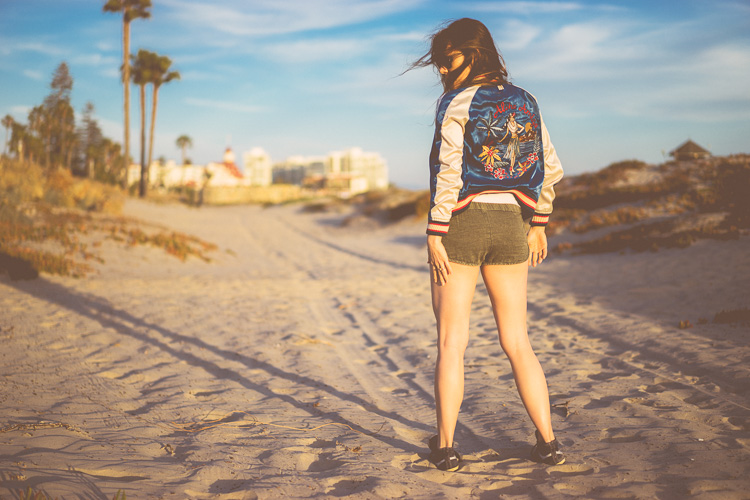
1/250, f/1.8, ISO 50
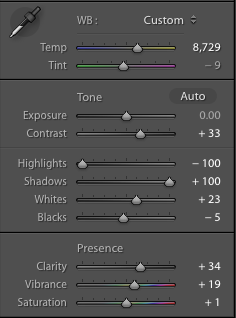
I pretty much used the same color settings as the previous photo to edit this, but quite a few different settings in the ‘basic’ module. I wanted this to show more of an orange color cast.
Sand Dunes: 7:07 pm PST
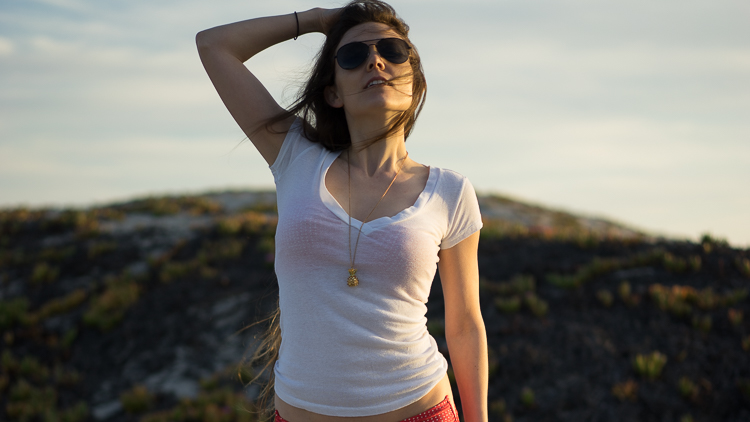
After the rock barrier, we moved toward the beach and encountered the mini sand dunes at the beach that I thought could provide a great background.
I placed Dominique with her back to a dune (which means now she was facing the rock wall which is why the sun is now camera right).
I wanted to break the rule of thirds a bit so I positioned her dead-center of the frame.
Before photo straight out of the camera:
After Lightroom editing:
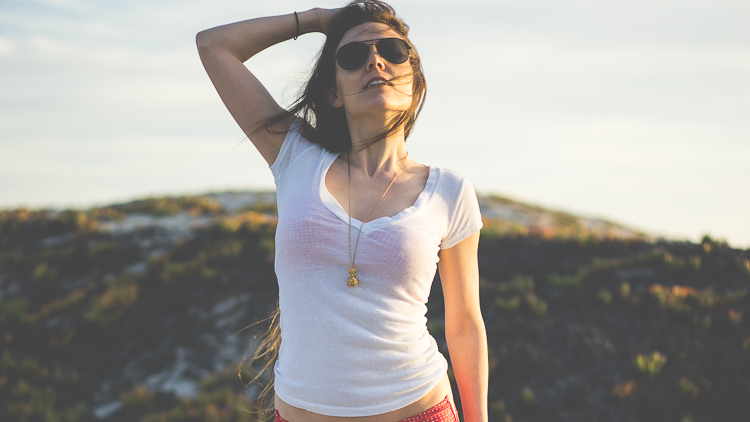
1/125, f/1.8, ISO 50
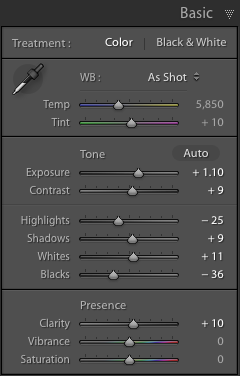
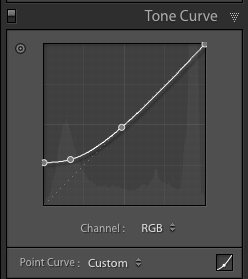
I brought up the exposure a full stop, did a little adjusting the ‘basic’ sliders, and applied a custom tone curve to make the blacks more grey.
Backlit: 7:12 pm PST
I don’t often shoot backlit so I thought, ‘what the hell’ and gave it a try. I placed Dominique with the low sun setting behind her head.
I had to make sure to slightly over-expose, otherwise the camera brain would likely try to expose for the sky, leaving Dominique too dark and underexposed.
Before photo straight out of the camera:
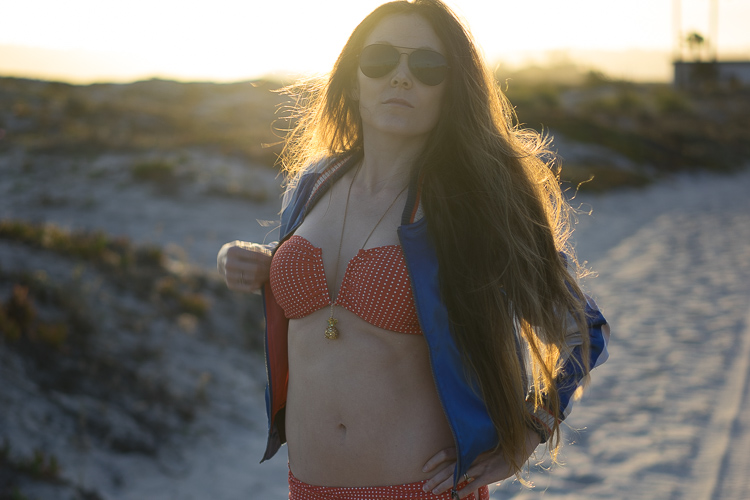
After Lightroom editing:
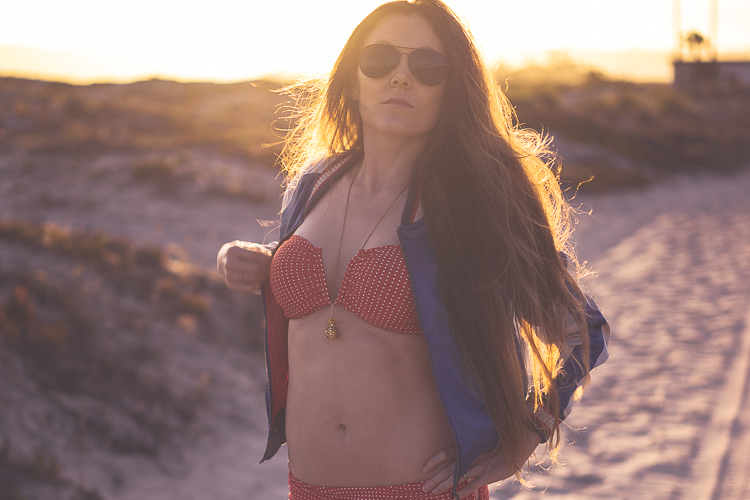
1/125, f/1.8, ISO 50
Just the two of us: 7:28 pm PST
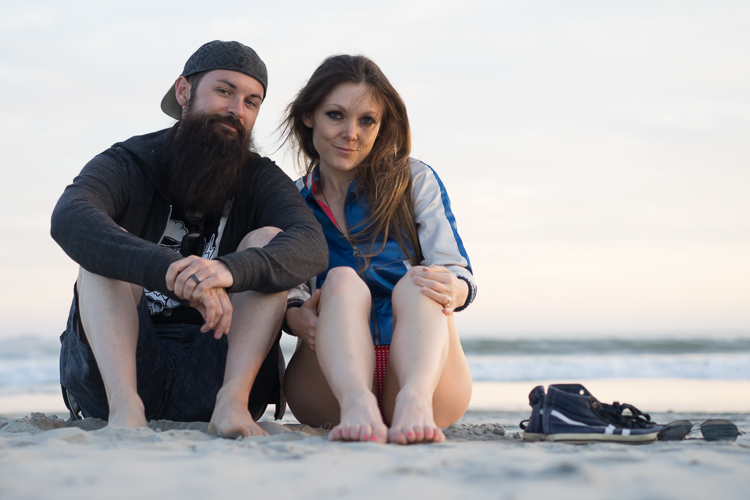
Whats a beach day without a photo of of yourself! After hanging out at the water for a while I decided to actually get in front of the camera and take a shot with Dom and I.
We walked up close to the water and set down out blanket. I placed my camera on top of it to serve as a makeshift low-pro stand.
I had Dom place her sandals and shades next to her, and framed the shot leaving space for myself on the left. I clicked the shutter and ran back into the shot.
Before photo straight out of the camera:
After Lightroom editing:
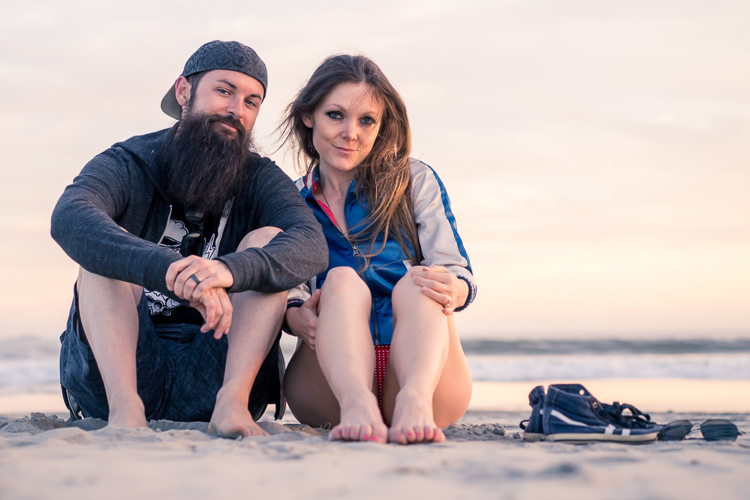
1/90, f/2.8, ISO 600
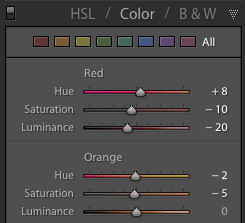
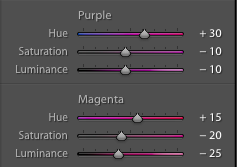
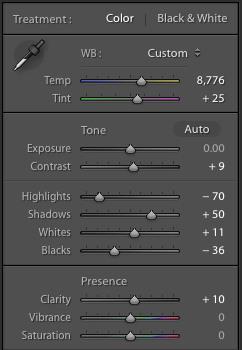
I pulled up the temp slider to make the photo more yellow, and pulled up the tint to add more magenta. I dropped the highlights (are you noticing a trend here?) upped the shadows to pull more detail into my beard, and dropped the blacks so they weren’t so strong.
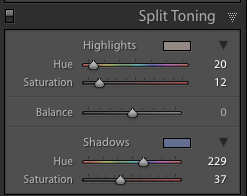
I then created some more peach/purple split toning to add some more color.
Coronado Beach: 7:33 pm PST
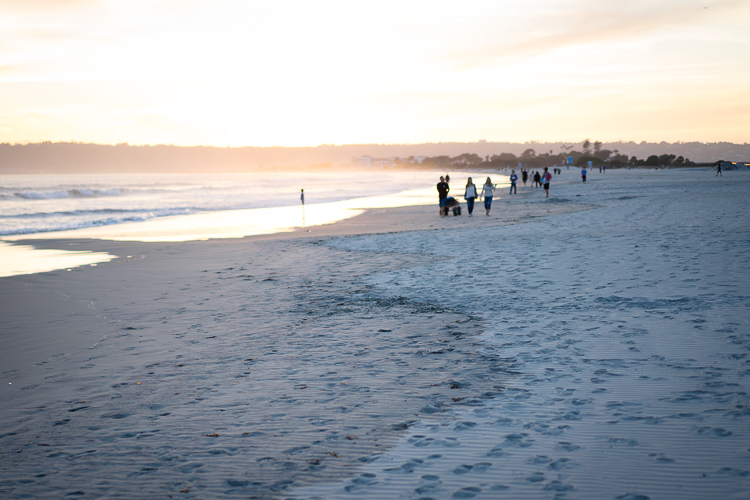
We got up to leave and I had to snap a quick shot of the sunset. Coronado really is a beautiful beach and I’m lucky to have it so close!
Before photo straight out of the camera:
After Lightroom editing:
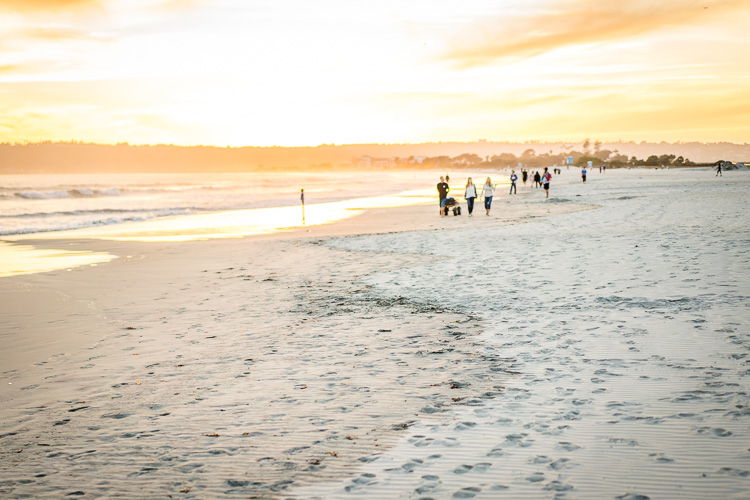
Coronado island beach, great spot for a beach fashion shoot! 1/200, f/1.8, ISO 125
This needed a lot of work! I pulled the temperature slider to the right to warm up the shot, pulled the tint up a little, then upped the contrast.
I then dropped the highlights, blacks, and saturation, while pulling up the clarity slider to sharpen the edges a bit.

It doesn’t take much time
Sometimes we use the excuse that we don’t have enough time to shoot as often as we’d like to. For this shoot we left home at 6:45pm, arrived at 7:00pm, shot until 7:30, and were back home by 7:45pm.
That one hour was more fulfilling than watching TV and I actually have something to show for it! I’m going to encourage you to make more time for yourself to get out there and create some images.
What do you think?
I think its highly important to make sure to specify what kind of editing I’ve done to my images so newer photographers don’t think they just came out of camera like that. I call that the Great Photography Myth and even wrote a huge blog post on how that hurts photographers.
I’m trying out something new in putting up screenshots of the module settings I’ve changed as I thought it might help visualize what I’ve done to change the image.
Is that helpful to you?
I think its highly important to make sure to specify what kind of editing I’ve done to my images so newer photographers don’t think they just came out of camera like that. I call that the Great Photography Myth and even wrote a huge blog post on how that hurts photographers.
So what do you think about putting the screenshots and shot settings in the captions of each photo? Does that help?
Would you like soft tones like the ones above? Check out my Soft Tones Lightroom presets
I realized how much of a different the right tone curve adjustment can totally change a photo and really impact how great it looks.
Since the tone curve adjustment panel and be tricky to get right, I’ve created a set of 25 tone curve adjustment Lightroom presets that work in just one click.
These presets only make changes to the tone curve panel, so you can simply ‘stack’ them onto your existing photos and edits to see how the different tone curves look.

Including the screen shots of the module settings is very helpful. Good idea!
Nice idea including the Lightroom processing details Mike, thanks.
Oh, and the beards looking good too.
The adjustments that you made don’t mean much unless you show before and after. For example, how dark were the shadows before you softened them by reducing blacks? I don’t understand what you mean by more “beachy 70’s’ color”
I liked the shot of you both sitting close to the water. Placing the shoes and shades beside Dom added interest to the foto and retained rule of thirds.
Thanks for sharing, Mike
Hi Chris,
That is great feedback, I didn’t even think about putting the before/after images. Give me a few hours and I’ll upload the ‘before’ images so you can see them straight out of camera. Thanks for the comment Chris!
Ha, thanks Pete! Its been a year and a half since I shaved and I don’t intend to stop anytime soon. I stopped shaving when I quit my job so its kind of become a symbol of freedom for me :)
Thats good to know Gary. Chris above had a great idea to include the before and after images so everyone could see exactly what the changes looked like. Check back later tonight and I’ll have those uploaded.
Mike,
Thanks for your posts, they are very helpful. I have been taking pictures for years but I am just getting involved with the processing aspect. I have Lightroom 5, and Elements 12 and plan to get going. Any beginner books and or videos that you to recommend to somebody just starting?
The before and after photos is a great idea. Lastly as you shoot over there on the West Coast, I am along the Atlantic in Ponte Vedra- thus I am out at least a half- hour before the sun is rising. Any major adjustments I would have to make to your sunset recommendations?
Once again thanks for all of your advice!
Mike
I’m late in catching up with this blog, but a big Thank You. You’re very kind to share your process, especially the post processing.
Keep up your good work, its much appreciated.
Yo brotha!
Love the bokeh and sharpness of that Zeiss 55mm! This was an awesome post! Super useful to see the before and after and the explanation of why you are adjusting different sliders (and how it achieves a particular desired effect). These pics also make me miss hanging out in SD!
One quick question – before you go out for a shoot, do you usually have a theme in mind (i.e. 1970s)? Or do you decide that after you get back and take a look at the raw images in LR?
Keep up the good work!
Hi Cheryl,
I’m happy to help in any way I can!
Hi Chris,
SD is definitely a great place for photography. I’ve been in love with this Zeiss 55mm.
Sometimes I’ll have a theme when I go out and sometimes I won’t. In this case I didn’t really plan out the shoot other than heading to the beach and knowing we were going to shoot a fashion shoot for Doms site. Other times when we have a solid theme in advance of the shoot I’ll go in planning for a certain type of look. I think it just depends on the shoot.
Hi Kevin,
Thanks for writing! When you ask about beginner books or videos, are you referring to learning more about shooting or editing? Let me know and I can list off some recommendations.
Interesting question about sunrise vs.sunset. In a sunset scenario most of the awesome light will come in the hour before sunset, and then about 30 minutes after sunset during the ‘blue period’ when the sun has gone down and the light starts turning purple/blue. In your case it would be the reverse. That nice 30 minute window before sunrise is when you’ll get that nice blue/purple colored light, and then the 30-60 minutes after sunrise is when you’ll get the nice warm orange color and long shadows.
I couldn’t help thinking .. those sun glasses need to go somewhere else…In her hand or pocket, but not over her beautiful eyes.
Appreciate the before and after process. It’s an area I need more practice and tutorial.
Hi Elle,
I’ll take that as a compliment :) Dom is the fashionista and if she says the sunglasses stay, the sunglasses stay! hahah.
I’m glad you enjoyed the blog and the editing info.
To be honest I liked the original version from the camera for each of the images except the first one. This is a question of taste of course, but to me after the edits the look dull and uninteresting.
Hi Andy,
No worries my friend! Thats what I love about photography – its all subjective! I’m glad you liked the originals :)
The thing that is important for each of us to remember is that you should shoot and edit for yourself, not your viewers. I feel that way about music, art, literature, etc.
I appreciate you taking the time to share your thoughts on the blog Andy, thank you for being part of this!
Great photos. Thanks for the before-afters and explaining your process. Not just your editing decisions but also your approach to framing.
I haven’t used tone curves much (actually, almost never). How is applying a tone curve different than adjusting Exposure/Contrast, HSWB in basic? Do they work together? Against each other? I sense I’m missing a powerful tool by not using it.
Hi Paul,
Great question. The tone curve simply gives you more control over the position of the black point, the white point, and all the grey in between. You can better control the amount of each that you’d like to use by manually adjusting that vs. the sliders. You can certainly use them all in tandem to get the best results. Maybe doing a blog post on the tone curve and different ways to use it would be a good subject to cover soon… :)
I like how you showed with light room the edit that you did with the pictures. Everything I do so far has been self taught so seeing some new stuff is really helping me out. Love your posts.
Thanks Marilyn, I’m glad it was helpful! I’ll make sure to do some more posts like this :)
Include them Mike. Very helpful!
Love the adjustment details – great way to learn from your experience. Thank you!
I’m glad you enjoyed the post!
You got it!
I like the inclusion of the screenshots showing your settings–it “clicks” more than simply listing the slider values.
I might have considered “softening” the faces a bit by using an Adjustment Brush to remove some of the contrast. It’s borderline harsh on your wife’s face in a couple of the shots.
Great tip promoting your Soft Tones presets. I bought them, but haven’t really used them so far. This gives me some ideas.
Currently working through your Monthly Edit videos. Very informative and useful!
Hi Carl, thanks for commenting! I’ll have to try out removing some contrast to see how it looks. Let me know what you think about the Soft Tones presets and the Monthly Edit!