A week ago I asked the Hacking Photography Facebook Forum Group what kind of blog post they would like to see and you answered! Lightroom training, and how to edit portraits were the top two, so I thought I’d create a post on editing portraits in Lightroom.
In the video below I show you how to quickly edit portraits in Lightroom and what to keep an eye out for when starting the edit.
Creating a game plan when starting the edit
Have you ever opened up a portrait in Lightroom and wondered – “What now?”
When I first start editing an image in Lightroom I take a second to create a game plan. Here is what I look for every time:
1. Composition:
Did I get it right in camera? Does it need a slight adjustment? Now is a good time to make sure you like how the photo sits in the frame.
If you don’t like it, use the crop tool to switch it up a bit to your liking.
2. Check the highlights:
How do they look? Are they blown out/overexposed? An easy way to tell is to take a quick look at your histogram.
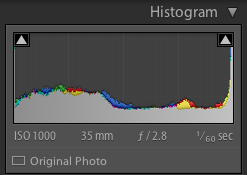
If your histogram in the Develop module in Lightroom is smashing up against the right wall, your highlights are going to be overblown. Consider dropping the exposure or dropping the highlights slider.
3. Check the shadows:
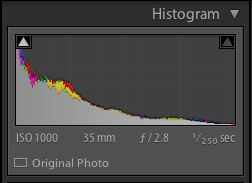
If you underexposed the image, or if the image has a lot of contrast it could mean you have lost detail in the shadows. If the histogram pushes to the far left, you probably need to bring up the shadows.
4. Look for vignetting
If you like shooting at big apertures, chances are you could have some vignetting (dark corners) in your image. Sometimes this can work well to frame the shot, sometimes it is distracting.
If you want to correct the vignetting, you can either do it manually like I did in the video with the graduated filter tool, or you can use the vignetting tools in Lightroom.
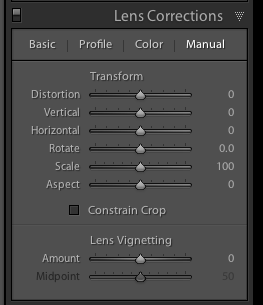
If you haven’t cropped the photo, you can use the vignetting tool under the ‘lens corrections’ tab in the develop module under the ‘manual’ selection.
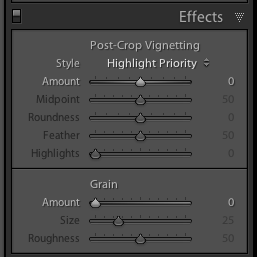
If you have cropped the photo, you will want to use the vignetting tool under the ‘effects’ tab. This will apply or remove a vignette after you’ve cropped the image down.
5. Take a look at the skin
How is the subjects skin? If there are blemishes, you will want to edit those using the spot removal tool like in the video or an adjustment brush (covered in other videos).
6. Noise
Depending on your cameras sensitivity to ISO and the level of ISO you used, there might be some noise in the image.
The amount of noise used in an image is totally a personal preference, but its something to consider when editing your portraits.
If you want to drop the noise, just head to the ‘detail’ tab, and look for the ‘luminance’ slider under the ‘noise’ header.
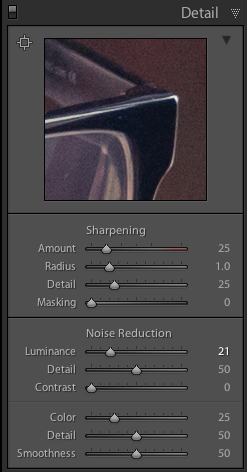
Pull it to the right to smooth out noise, just remember not to go too far or you will loose detail in your photo.
7. Color and hue
What feeling do you want your portrait to convey? Do you want it to be as true to real life natural colors as possible?
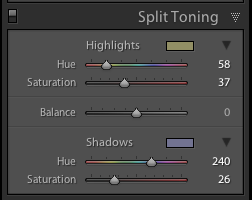
Do you want it to be warm and happy (use warmer color hues)? Do you want it to be intense, or gloomy (use cooler colors)? Or do you want to create a vintage vibe (use split toning)?
Before/after
So here was the image we got straight out of camera vs a quick edit:


Much better if you ask me! There are a million ways I could have edited this, but this was a quick illustration on what to look for when editing your portraits in Lightroom.
Click below to download my 12 free Lightroom presets!
If you haven’t already – click the image below to download my 12 free Lightroom presets!

Love your tutes. I would’ve cropped out the lights on the left entirely as my eye is drawn straight to them. Cheers
This tutorial was AWSOME! Thanks! I’d love to learn more about Lightroom & everything it can do. Any suggestions for me?
I have seen many videos on this subject. Some of the one that I washed some were pay to watch like training on their web site, purchased, books and some free web sites.
For me your video on 7 Tips for Portrait is the best of the entire one I watched so far. You touched some tips that I never heard of.
Super-duper excellent job.
Thank you for publishing this for us. Please keep the god job coming.
All the best,
Mo
Thanks Mike,
really clear instructions for great results. I have never used split tones but I well now for sure!
Cheers
Erin
*will
Great tutorial Mike, very easy to follow and informative. Thank you!
Hi Mike and thanks a lot, i d love to learn thanks again.
Mike, wonderful short, concise and thorough presentation. Outstanding. Please keep them coming. Thanks
Thanks! Very helpful. I like how you explained what each setting does, versus just telling to use it. Often a lot of videos tell you what to do without explaining what each option does. Looking forward to future posts!
I thought of that after recording the video! hahah, great eye Bev :)
Hi Mary,
I have a lot more videos coming soon! Feel free to subscribe to my Youtube Channel to get updates as soon as they come out. Thanks for the comment!
Wow, thank you so much for the kind words Mo! It means a lot. I’m glad you enjoyed the video. I’m going to start putting out a lot more soon!
My pleasure Erin. Split toning can be really fun once you get the hang of finding complimentary colors. It can give photos a really cool vibe.
Absolutely Tracy!
I’m glad you enjoyed the video and post!
I appreciate it Rich! I’m going to try and keep them fairly short because my own attention span makes it difficult to follow a 2-30 minute long tutorial :)
Thanks for the feedback Jeff. I’ll keep in mind to make sure and show what the tools do when I cover them vs. just telling people how to use it. I learn best that way and assume that others do to. I’ll keep the posts coming!
great video….very well done….clear and concise….I love portrait photography these tips will help take my photos to the next level.
Thanks…..you keep videoing and sharing & I will keep watching and learning!
So glad I found your article! You give me hope in becoming better artist of my craft. I’m fairly new to LR and I’m always looking at my photos trying to figure out what small adjustments I can make just to enhance them overall and still look natural..thanks so much.
I’m happy to help Sharon!
Hi Tiffany,
Thanks for your comment! I really appreciate your feedback. I’ll keep putting out videos if they help!
Hi Mike, great video loved the tips. Question for you – What version of lightroom are you using? I have LR 4 and can’t find where to open up the preview panel you’re using in the upper left corner of your screen when deciding which preset to apply. Thanks again and btw I love the preset bundle I bought from you – they really make my images pop!
Hi Robin, thanks for your order!
I’m using LR Creative Cloud, but LR 4 works just the same. You likely have your “presets” window hidden.
Go to “window” in the menu bar, then ‘panels’ then click ‘presets’.
Another way to do this is if you see the word ‘Presets” on the left of the screen click the little arrow to the left of the word “presets” and it will open up the preset window.
Hi Mike,
Great video!! I learned some things that I didn’t know existed in Lightroom. They’ll save me a lot of time with editing. You need to do more of these. You touch on things that others don’t even mention.
Hi Gary,
Thank you for the great feedback! I will start doing more of these if you find them so helpful! Thanks for the comment :)
Great video, thanks. The one thing I do a little differently is I always begin with perspective correction, followed by the crop. That way I’m not making adjustments on parts of the photo that I’m only going to crop out later.
Good point Dave, thanks for sharing!
Hi Mike, I love to watch how others edit – one question in the spot removal why do you use clone instead of heal? I often find clone leaves a noticeable circle even if I feather the edges but heal makes a really nice smooth unnoticeable spot. – Leda
Hi Leda,
Good question. In this case the spot removal brush would have worked just fine as well, and is likely a better tool to use than the healing brush in most cases with skin. I used the clone tool because the blemish was pretty small and the opacity was dropped down so it didn’t make an exact copy of the surrounding skin.
Love this tutorial Mike! One of the best I’ve seen. Very straight forward, and very easy to understand. Kept my attention. Sometimes when I watch someone’s tutorial I get lost trying to figure out a step. Great job!
Thank you Kelly! I try to keep them short and to the point when I can!
Many many thanks for sharing such a superclass tutorial. No doubt! I am so much impressed by your tutorial. keep posting such kind of information on your page. I will certainly dig it and personally suggest to my friends. I’m sure they’ll be benefited from this website.